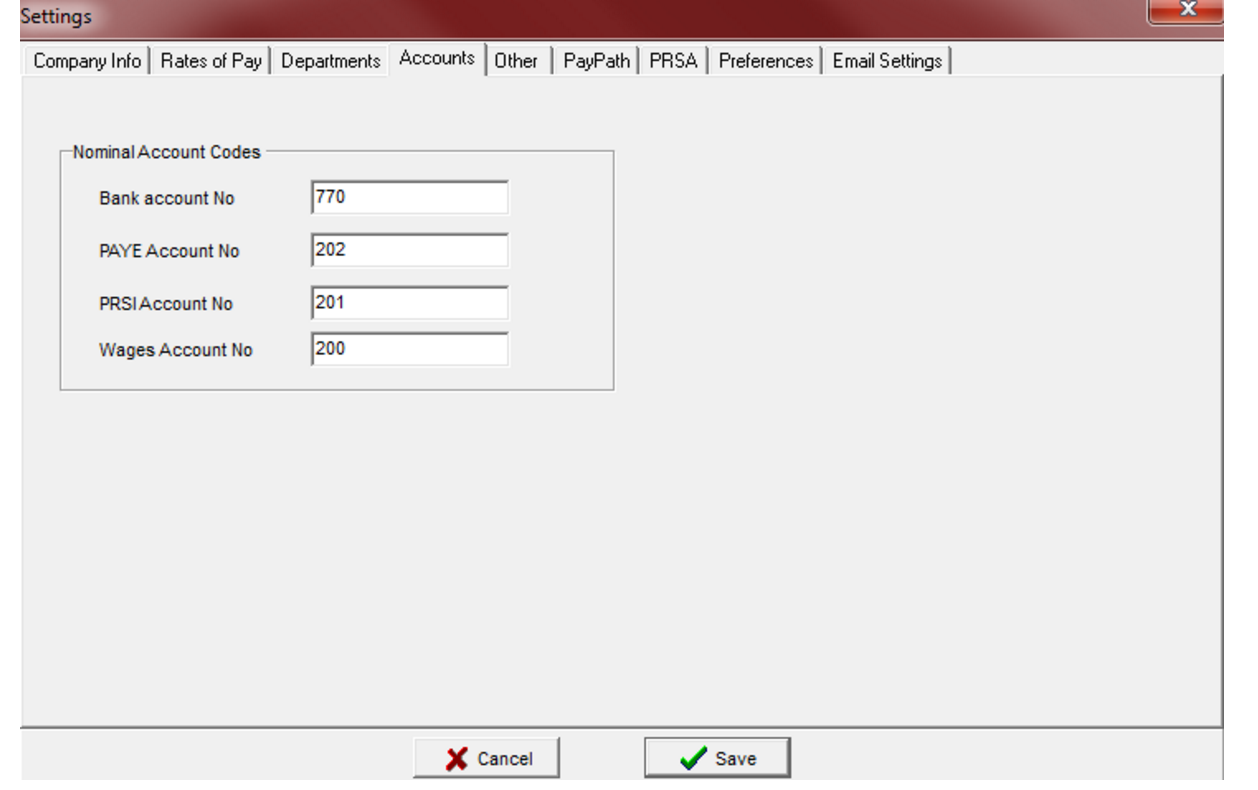
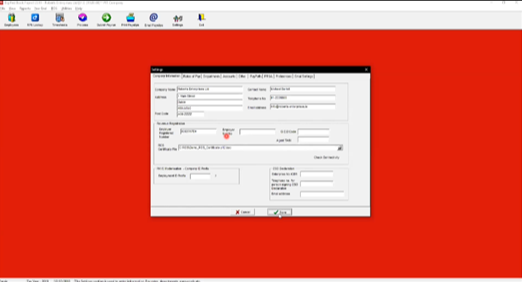
Account codes are set up by selecting the Settings Icon, and clicking on the Accounts Tab. This section is used to present account system information on the “Weekly Tax Summary Report” to aid posting journal entries to an accounts system.
2: How do I do Email Setup?
Setup for each employee
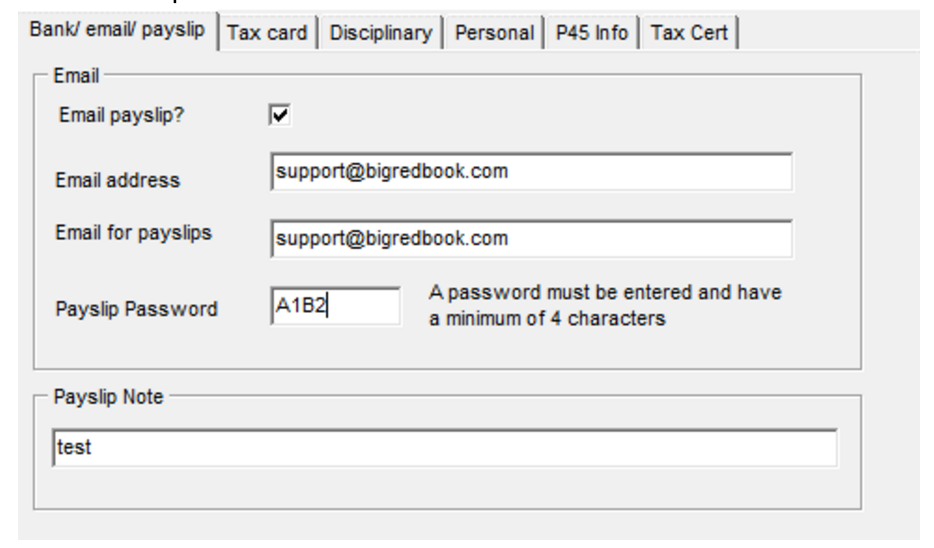
To email a Payslip you must assign an email address and password to each Employee in the Employee screen on the Bank / email tab. A password must be entered.
Setup for company
To setup the account to email from select Settings and the ‘Email Settings’ tab.
On this tab you choose the method of emailing Payslips. The default message for the email can be specified here and can also be changed when sending payslips .
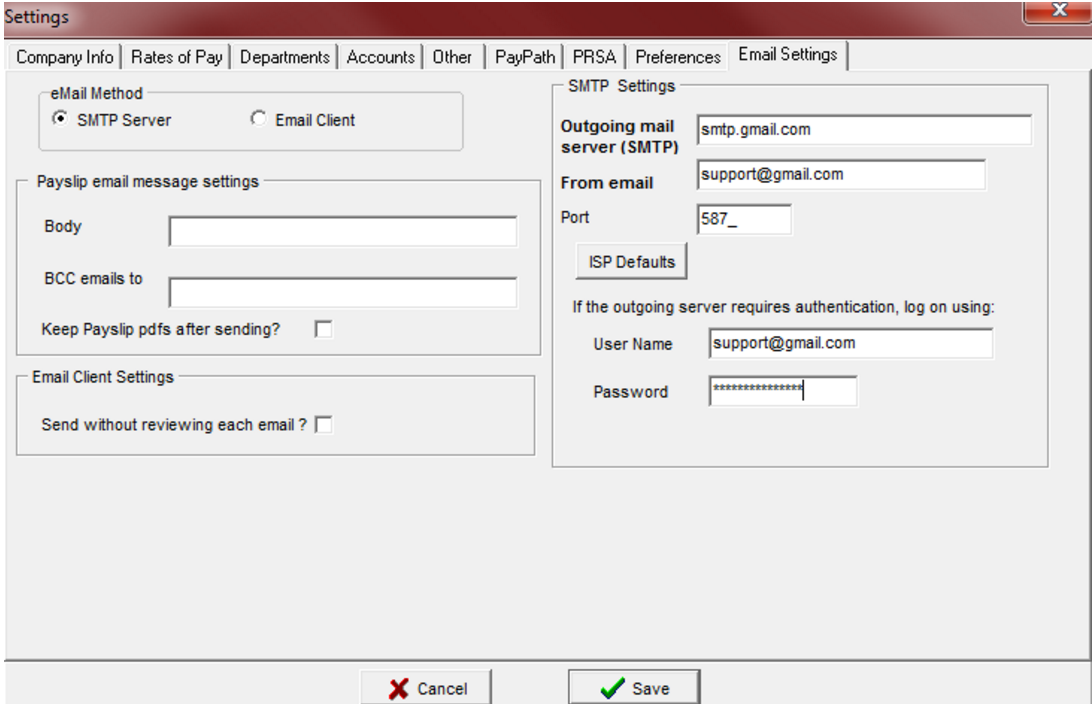
SMTP Server
Choose this option to send emails directly from you email server.
To use this setting you must specify the name of your server and the ‘From’ email address.
Emails will be sent directly via the server and a copy may not be made in your ‘Sent Items’ folder.
We recommend that you specify a BCC (blind copy) email if you require a copy of the emails sent and your
server does not save a copy of emails sent via SMTP.
If your server requires Authenication you must enter your email User Name and Password.
The ‘ISP Defaults’ button allows you to select the default smtp server and port for some of the most
common ISPs.
Email Client
Choose this option to send the emails via your email program. Emails will be created one at a time and displayed for Review, click ‘Send’ on each to send. To skip the display of each email you can select the option ‘Send without reviewing each email?’Depending on your Email Client (Outlook, Eudora etc.) and security settings on your system you may have to confirm ‘Allow’ for each email as it is sent. A copy will be made in your ‘Sent Items’ folder in the usual way.
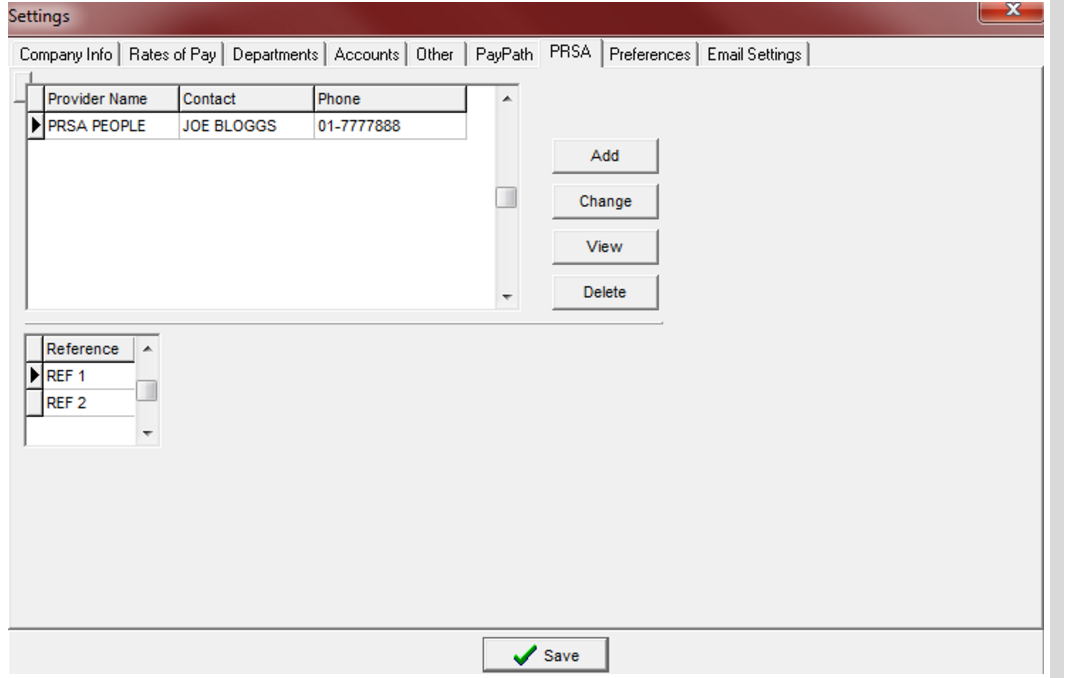
3: How Do I Set Up PRSA?
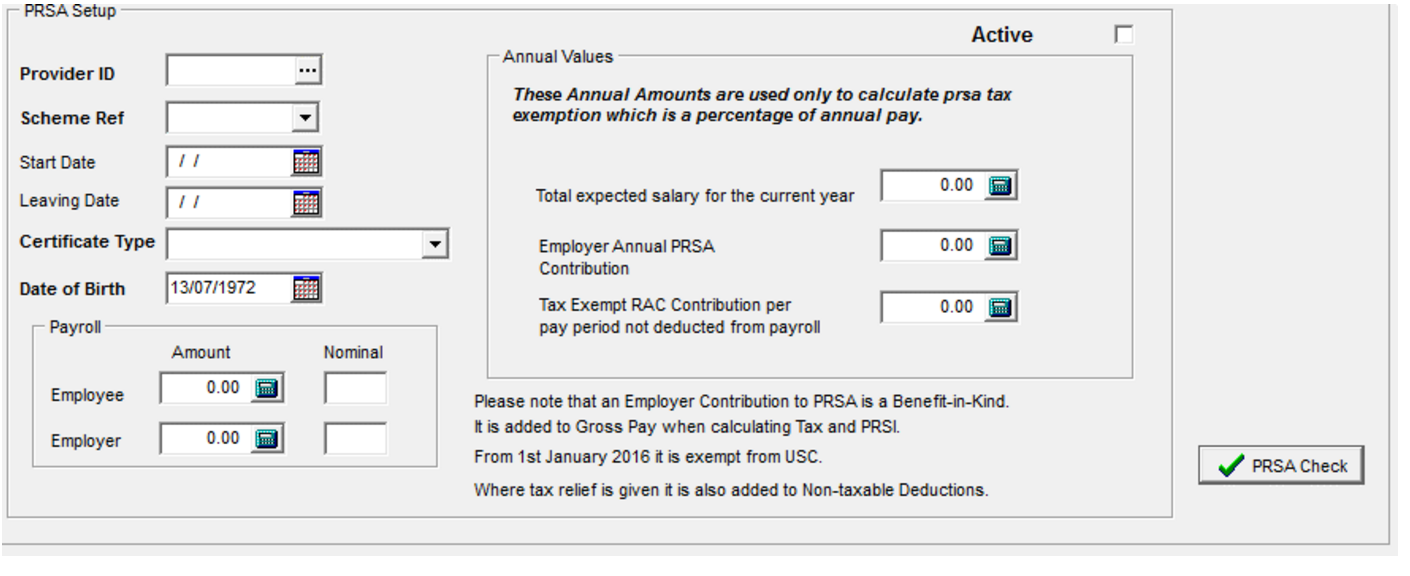
Details of an employee’s PRSA are entered in the PRSA Setup Tab.
Please note that the data in the ‘Annual Values’ panel are only recorded here for the purpose for calculating the amount of PRSA contribution that will be exempted from tax per payrun. Tick the ‘Active’ Box to activate PRSA schemes – an error message will be displayed if essential data is missing and the deduction will not be activated. At any time click on ‘PRSA Check’ button to check that all relevant data has been entered
4: How Do I Track Holidays?
This section is used to track holidays per employee. Both days and hours can be entered.
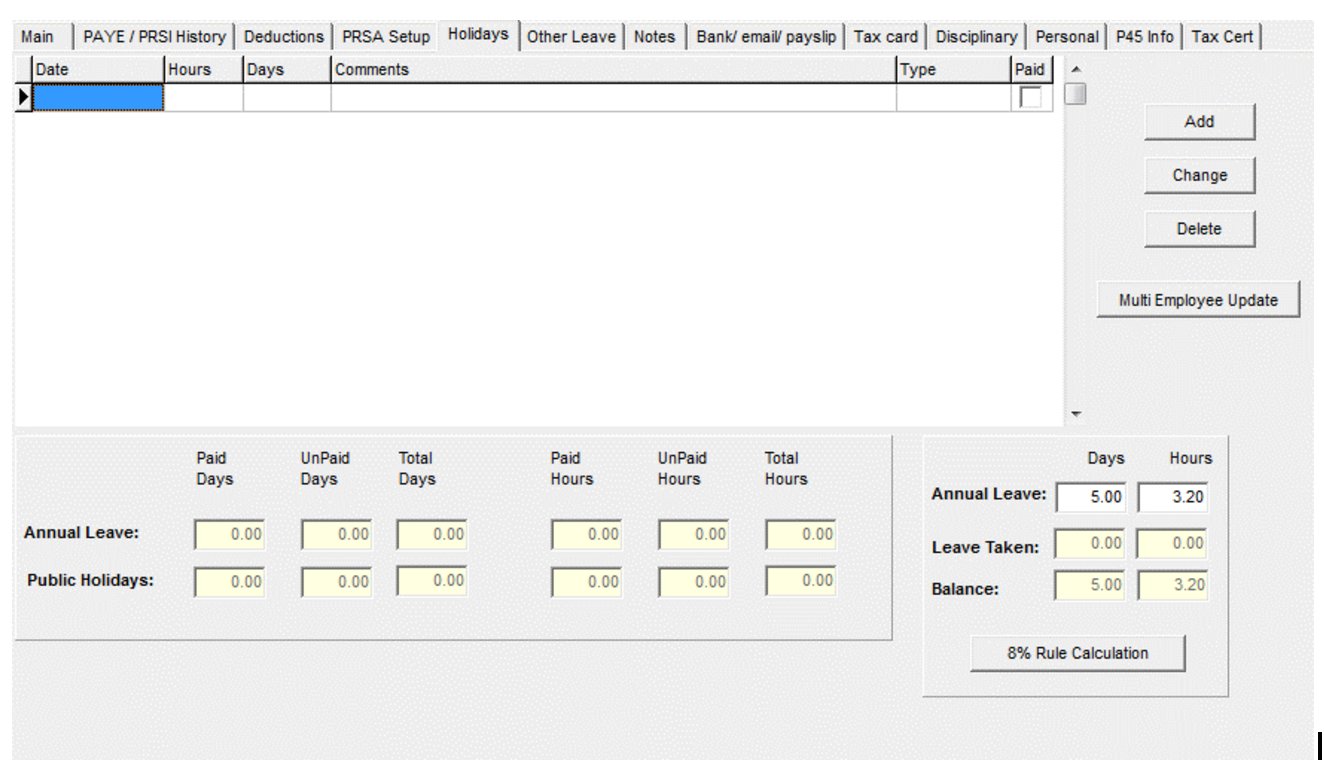
To add a new Holiday entry click on the ‘Add’ button and complete the entry screen. All holidays must be
designated Paid or Unpaid and Annual Leave or Bank Holiday.
To update an number of employees at one time click on ‘Multi Employee Update’ and select the
employees to update with the holiday details.
An analysis of hours/days paid/unpaid and totals is displayed at the bottom of the screen, including a
summary of Annual Leave entitlement, Leave Taken and Balance.
Annual Leave
Where Annual Leave is known it can be entered directly into the Summary panel.
Where there is not fixed Annual Leave there are three methods of calculating minimum entitlement to
holiday pay:
- 4 working weeks (20 days) in a leave year, where 1,365 hours have been worked (on a whole year
basis)
- ⅓ of a working week per calendar month, in which at least 117 hours were worked
- 8% of actual hours worked – subject to a maximum of 4 working weeks
8% Rule Calculation
To calculated Annual Leave entitlement based on actual hours worked click on “8% Rule Calculation”
button to display a window similar to:
The Hours Worked per Payment Records is displayed. Enter any hours worked but not yet paid (i.e. processed yet in payroll) and any other applicable hours not recorded e.g. Sick Leave, Maternity Leave etc.
This will give the total applicable hours.
The number of hours per day must be entered.
Click the ‘Calculate’ button to calculate the number of days holidays the employee is entitled to.
5: How Do I Do A Mid-Year Start Up?
This feature is used only when starting to use Big Red Book Payroll in the middle of the tax year where it is impractical to re-process payruns from the start of the tax year. (See the ‘Other’ tab in Settings).
Employees who have already left
Please note that data entered here is for setup purposes only. The details are not included in the system for P35, P45 etc reports until as least one payrun has been processed. To include employees who have already left the information should be entered from their second last pay and then their last pay processed through the system.
To set up employees in the middle of the tax year, the following steps should be taken:
- From you existing Payroll system or Tax Cards get for each employee:
Gross Pay
Gross Taxable Pay
Tax Paid
Employer PRSI
Employee PRSI
Gross Pay subject to USC
USC Paid
Gross Pay subject to PRSI (for employee)
PRSI Classes and weeks at each Class
LPT start date
LPT amount paid
2. Set up the employee as usual, if you have a Tax Certificate File from Revenue you may use this to setup employees. On the PAYE/PRSI History Tab, enter the totals in the mid year startup section as follows:
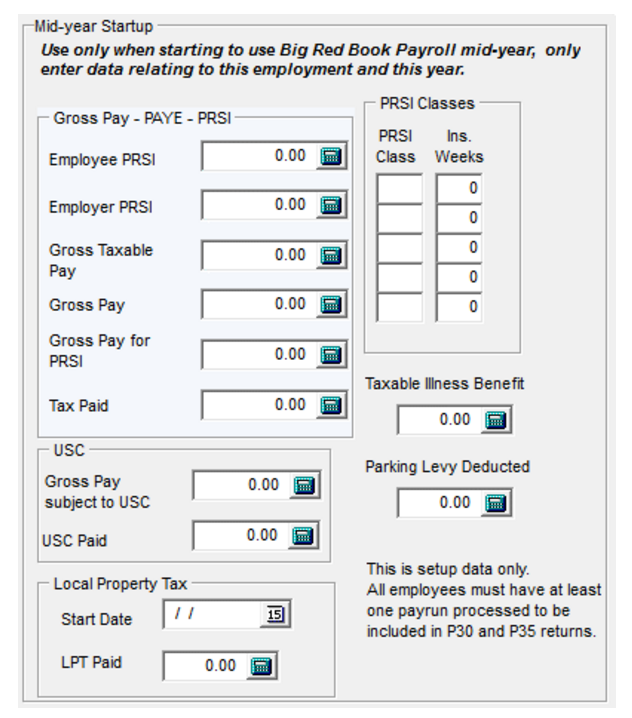
Save the employee details. The employee may then be processed from that point forward as normal, and the Mid Year figures will be taken into account in calculating Tax and PRSI and USC and will be included in Year End P35 and P60 reports.
It should be noted that once a payrun has been processed for an employee, the Mid Year startup option will be disabled for that employee and may not be amended.
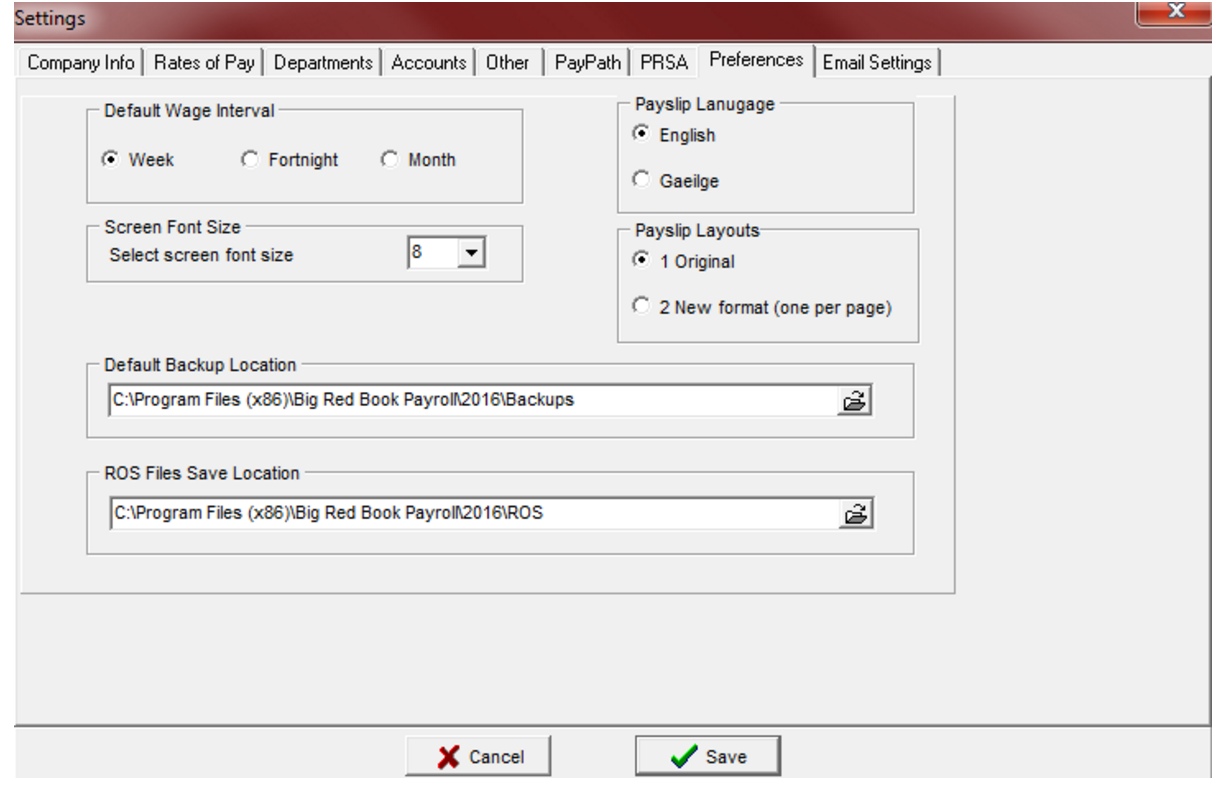
6: How Do I Set Up My Preferences?
On this tab you can:
- Select the Default Pay Period you use to aid ease of use.
- Select the language for Payslip headings
- Select the type of Payslip layout
- The Original has two payslips per page, new format has one per page and is the format used when
- payslips are emailed from the application
- Screen Font Size
- The default font size is 8 – you can select 9 or 10 to increase the font size for the Employee and
- Time-sheet entry screens.
- Set the Default Backup Location
- 6. Set the location where ROS files will be saved.
7: How Do I Add PRSA Schemes?
PRSA Schemes
Before you can setup PRSA details for employees you must first setup PRSA Providers and Schemes to which they will subscribe.
To Add a PRSA Provider click on the Add button. The following screen will appear and details of the PRSA Provider and the Schemes they offer can be entered. Click Save when done.
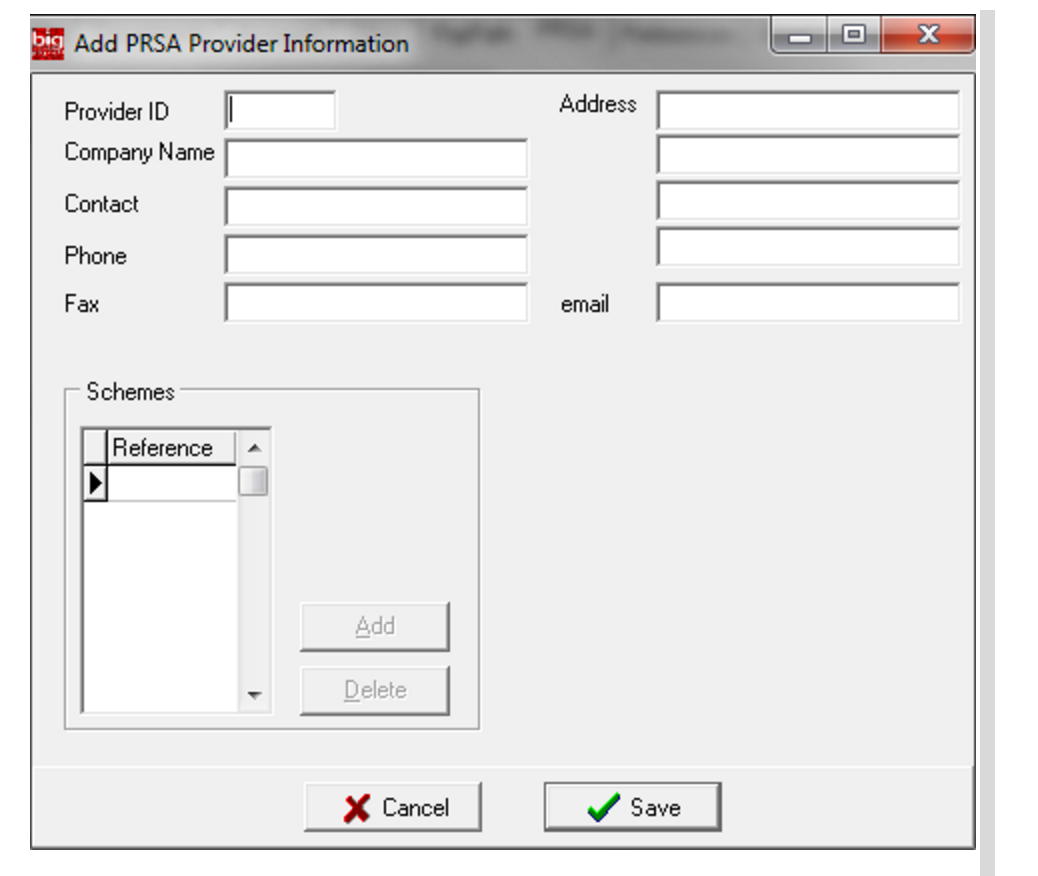
The new PRSA schemes will now appear in the ‘PRSA Setup’ tab in Employee Details.
8. How do I prepare my employee listing for ROS
PAYE Modernisation
We have it broken down to 3 steps.
1: Tidying up employee details – If you are happy your employee details are up to date skip to step 2.
2: Generating Employment ID
3: Creating ROS Employee List
Creating ROS Employee list.
- Tidying up employee details.
Employees that have not worked for the company in 2018 should be deleted if there is no plans for them to work for the company again.
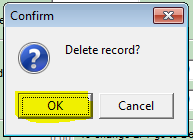
To delete an employee go to that employee in employee details and click on the RED X.

Once you click on the RED X you will get a conformation message “Delete Record” OK or Cancel. Click OK to delete record.
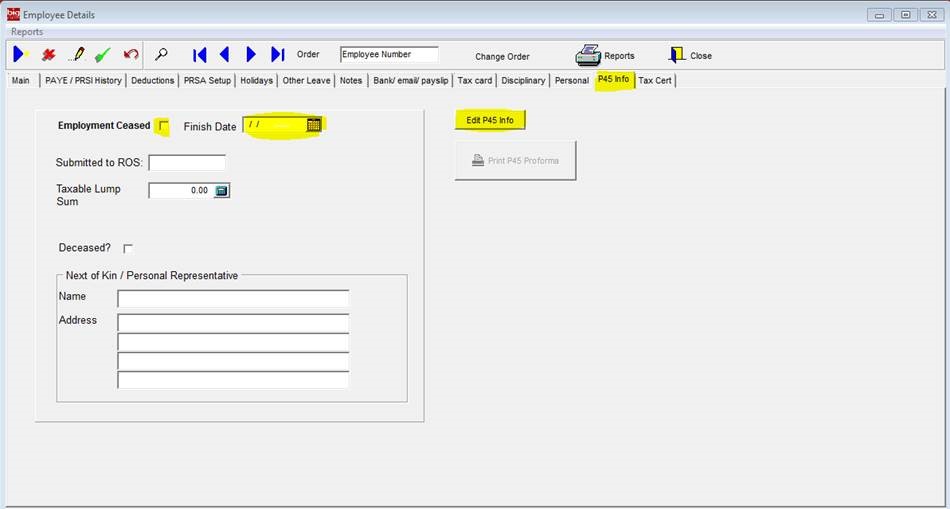
If the RED X is greyed out it means that employee has had a completed PAY RUN in 2018 in that case you need to do a P45.
Click on the P45 Info Tab along the top.
Then click on “Edit P45 Info”
Enter the “Finish Date”
And tick “Employment Ceased”
Creating ROS Employee list.
2. Generating Employment ID.
To create Employment ID go to Utilities and select Employment ID
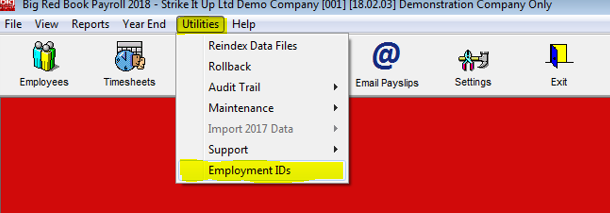
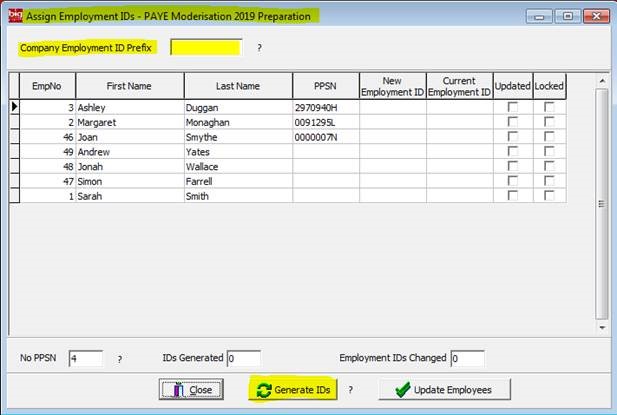
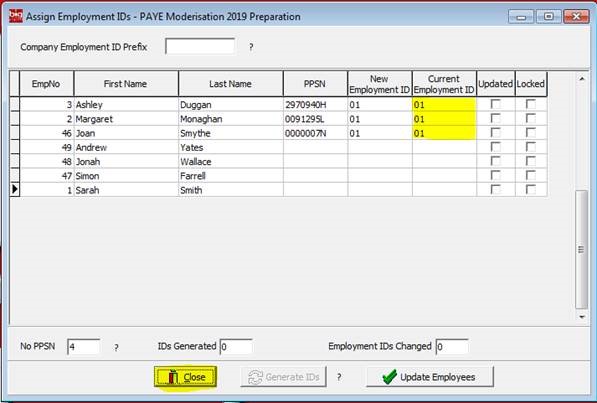
The next window that opens it will display Assign Employment IDs PAYE Modernisation 2019 Preparation.
The Company Employment ID Prefix is blank by default this is perfectly normal.
By Default the system will add 01 as a prefix by clicking on “Generate IDs” Employee’s that have been given P45’s may appear in the list this is OK.
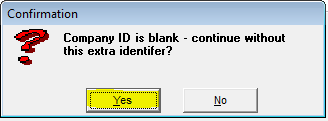
The Next window will look for conformation “Company ID is blank – continue without this extra identifier?”
Click YES or NO
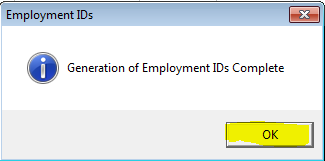
You will then get window with following message “Generation of Employment IDs Complete”
Click OK
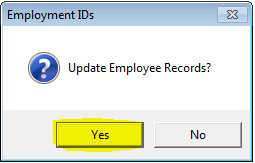
The Next window will look for conformation “Update Employee Records”
Click Yes to update all records
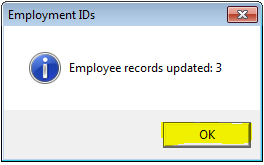
The next window will notify you how many employee records have been updated Click OK
It will return to the Assign Employments IDs window. You will see under the column “Current Employment ID” all employees that have been updated.
To close the window click Close
Creating ROS Employee list.
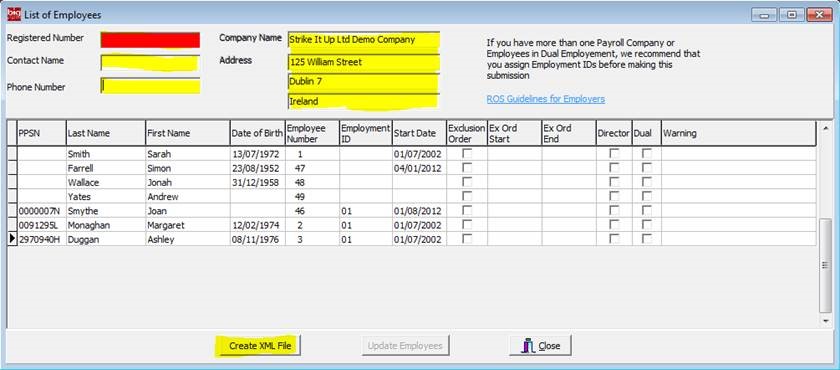
3. Now to create your ROS Employee List.
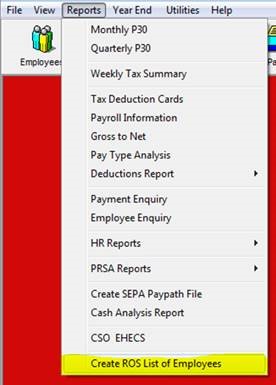
To create employee list select “Reports” along the top.

Then select “Create ROS List of Employees”
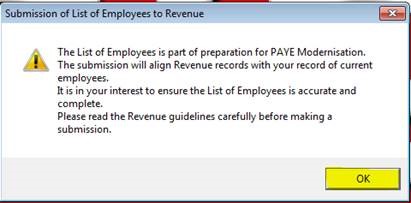
You will get a new window with a warning message. Once you have read the message and happy to move on click on “OK”
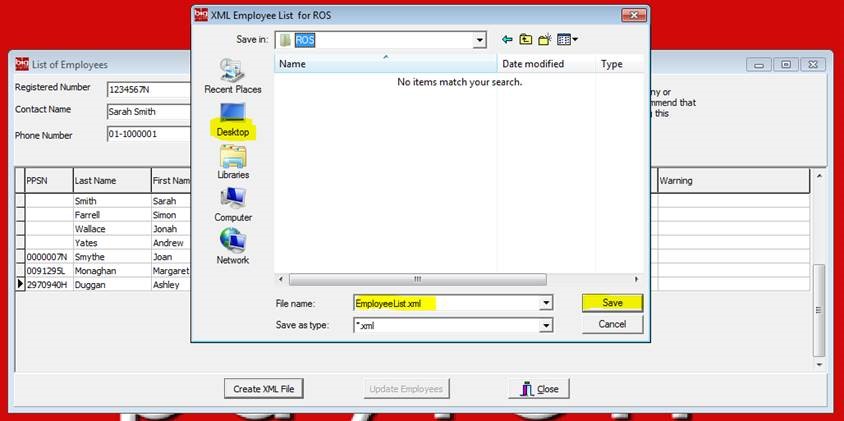
The next window is looking for a location to save the File
By default it will save the file as “Employee List.xml”.
You can also change the location the file is saved to the easiest is probably the “Desktop”
Once you are happy with location the file is being saved click on the “Save” button.
The next window is looking for a location to save the File
By default it will save the file as “Employee List.xml”.
You can also change the location the file is saved to the easiest is probably the “Desktop”
Once you are happy with location the file is being saved click on the “Save” button.
The next window is a conformation window click “OK”

You can now click “Close”. Your employee list is created and should be in your saved location.
You should now be prepared to upload your employee list to Revenue.
Below are two links from revenue that may be of help.
Following link is Revenues PAYE modernisation explanation
https://www.revenue.ie/en/employing-people/paye-modernisation/index.aspx
Following link is for Revenues List of employees – guidelines for employers. PDF file
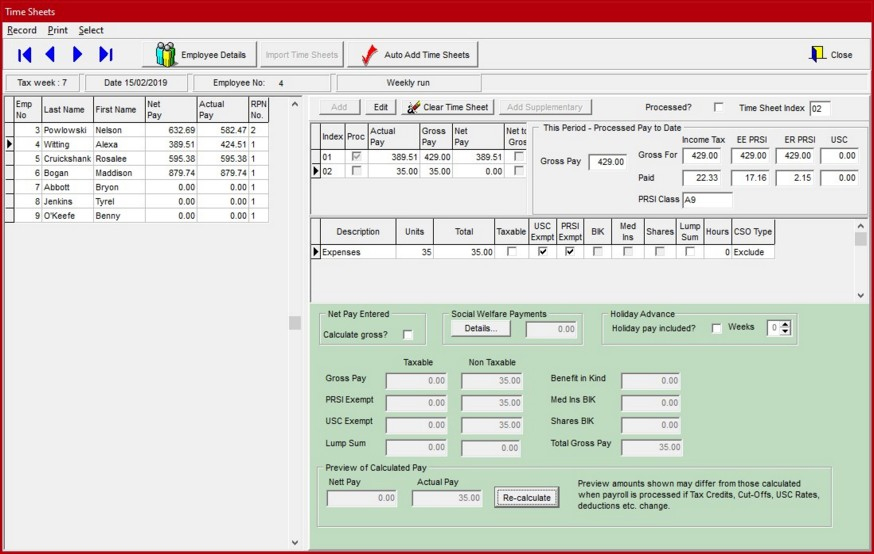
10. Adding Supplementary Payments
Supplementary Payments will not be added to the PayPath file and should be paid in a different manner.
When it is required to make more than one payment in the same pay period, a supplementary payment must be entered.
Go to Timesheets and enter the date you wish to make the supplementary payment for.
Supplementary Payments can only be made in the current or future pay period. It can also be made before or after the regular (Primary) payment.
Click on the employee you wish to make the supplementary payment for and click ‘Add Supplementary’ button.
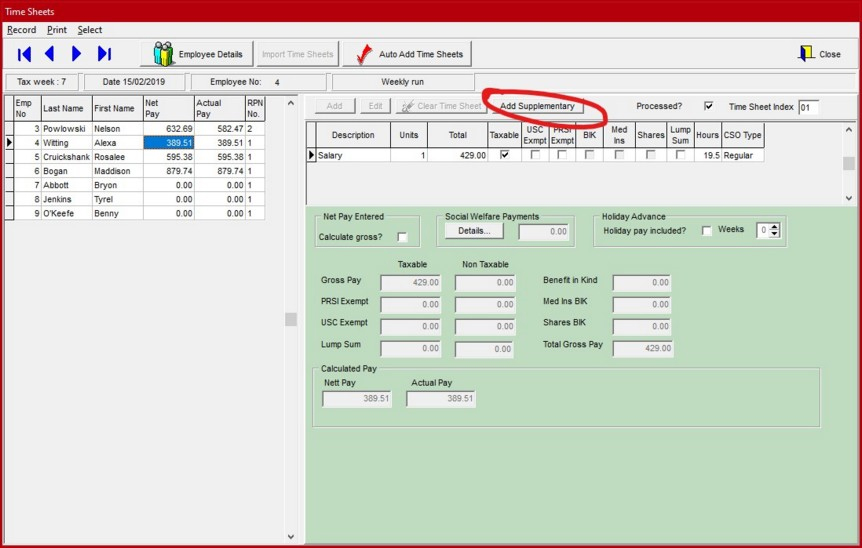
A confirmation will display. Click ‘Yes’ to continue.
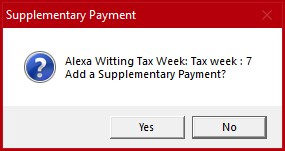
This will open a new timesheet. Select the rate of pay and enter the units and other details as you would for a normal timesheet. The example below shows a Supplementary Payment for €35 Expenses.