Managing Your ROS Digital Certifiate
Managing your ROS Digital Certificate.
You need to know where the ROS certificate is saved before proceeding.
If unsure you can download it again from the ROS website.
Download From ROS
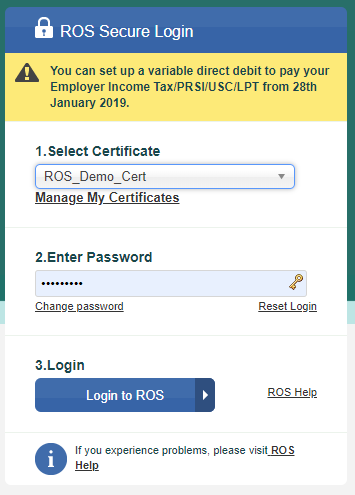
On the ROS sign in page click on the “Manage My Certificates”
When the next screen loads Click on the circular arrow.
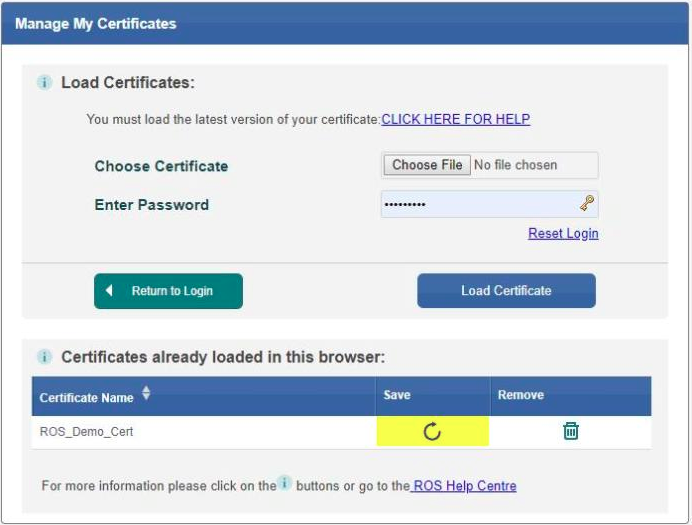
And then click save on the next window.
Different web browsers download differently but they should download to the downloads folder.
From the downloads folder you will be able to copy and paste it to your ROS folder.
Connecting your ROS Certificate to Payroll
Ros Cert setup
From 2019 Big Red Book Payroll will connect directly to ROS for getting RPNs (formally known as P2C) and for
submitting payslips to Revenue also.
To connect your payroll 2019 to ROS you first need to have your PC registered with revenue or get a sub cert from
ROS.
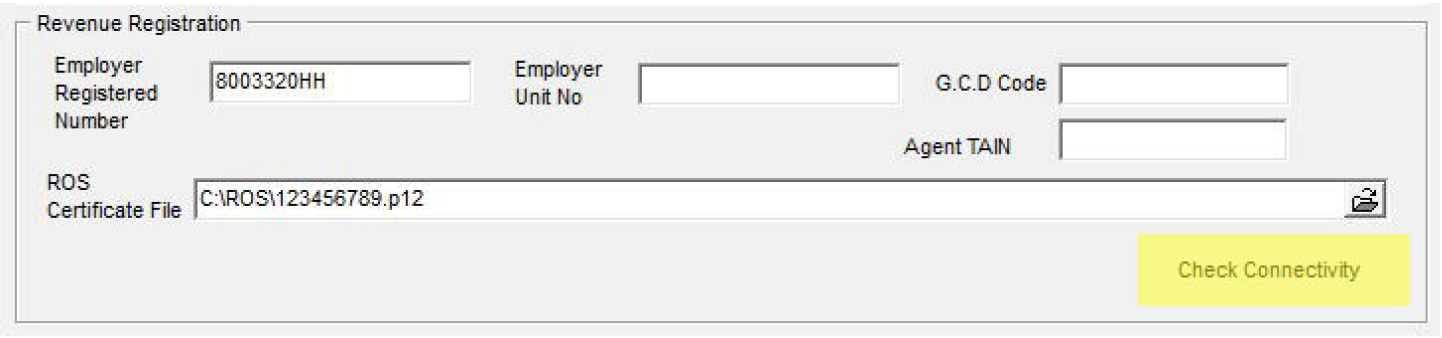
From the main screen click on “Settings”

In settings it is the Revenue Registration section that needs to be setup.
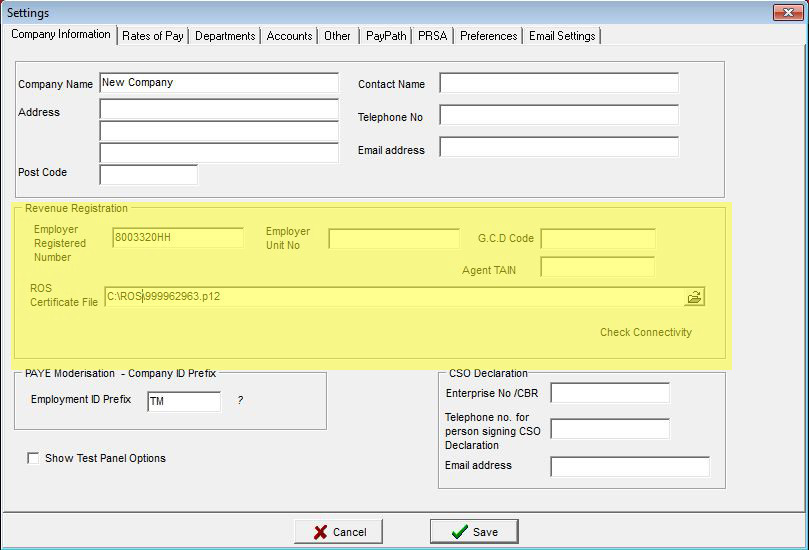
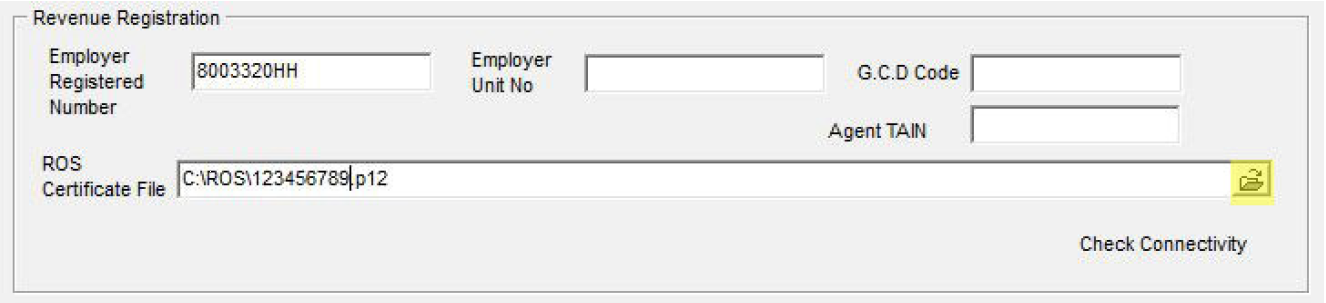
From here you need to fill in your Employer Registered Number and load your ROS Cert.
To load the ROS Cert, click on the folder:
A window like below should open. You need to select Computer or This PC then select the C drive it will have the
letter C in brackets like so (C:) in example below it is called Windows 7_OS but this can be anything so look for the C
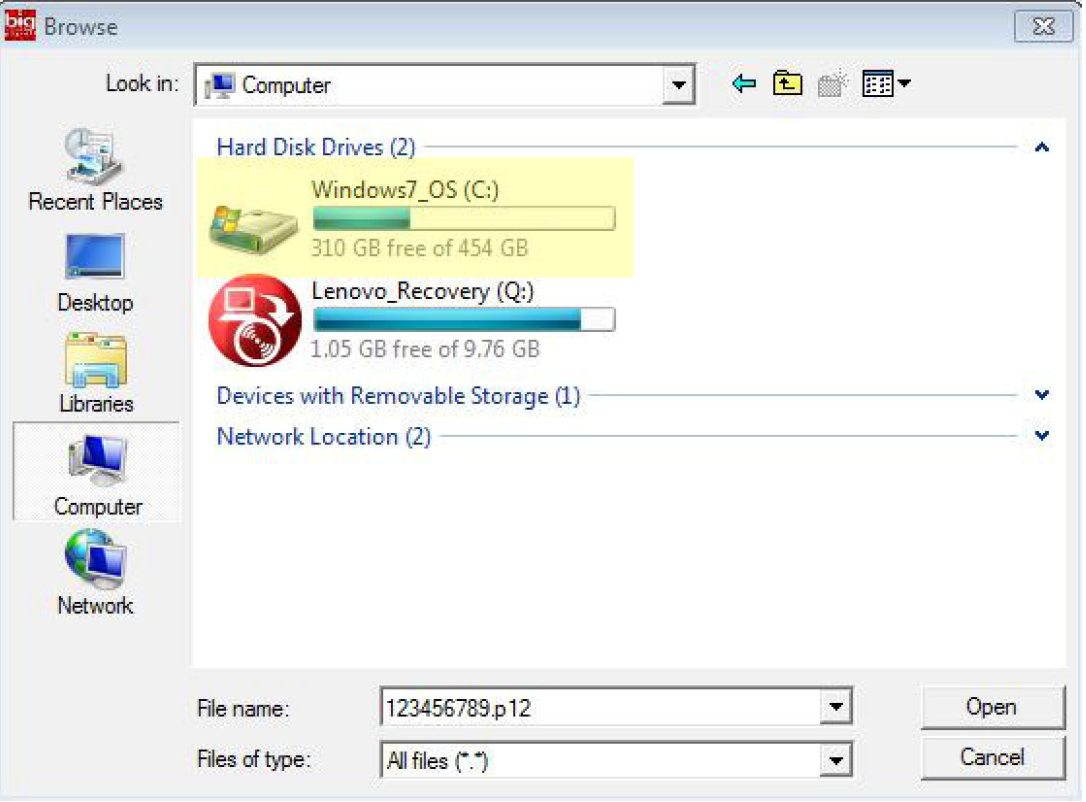
Open your (C:) you should then find a folder called ROS and from there you should be able to see your ROS Cert.
Highlight it and click Open
(If your ROS folder isn’t on your (C:) you will need to contact Revenue in sourcing the folder or getting new ROS Certs)
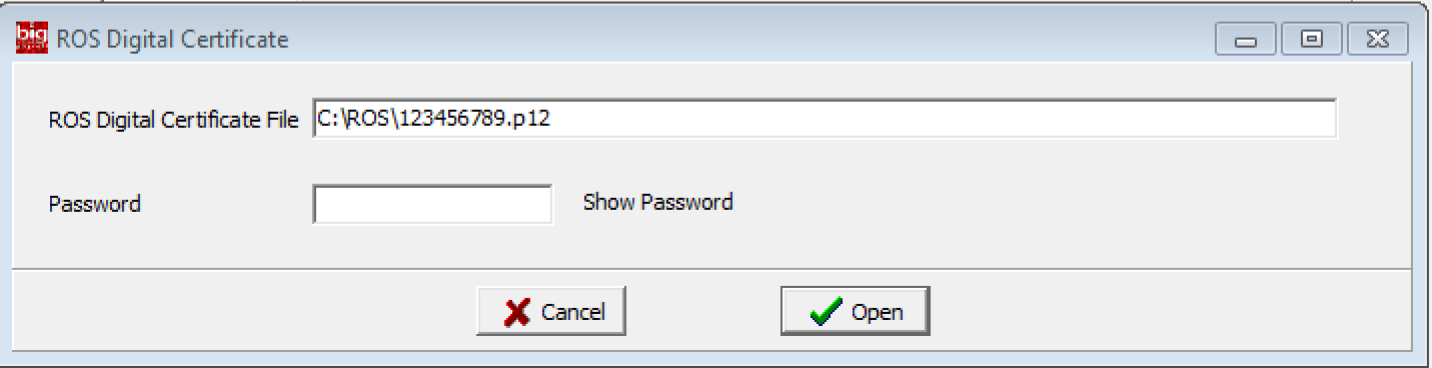
You can then click on “Check Connectivity” to test connection to ROS.
It will pop up window requesting your password for your ROS Cert
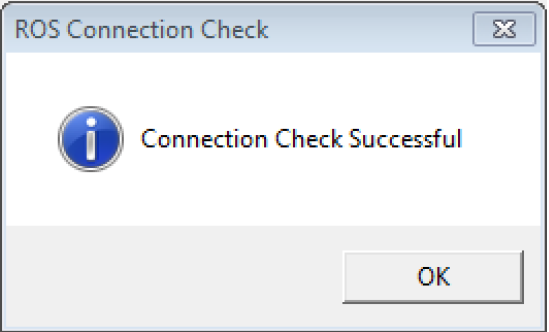
You will get a confirmation window with “Connection Check Successful”
Requesting RPN
Requesting RPN
1. Requesting RPN
When you submit you first pay run for 2019 Revenue will update Employment IDs from the pay run information. When you lookup RPNs again an updated RPN (with Employment IDs) will be returned for each employee. From then on RPNs will be returned only for employees where there has been a change.
When doing your pay-run the first step is to request your RPN’s from Revenue. To request your RPN’s click on RPN
Lookup.

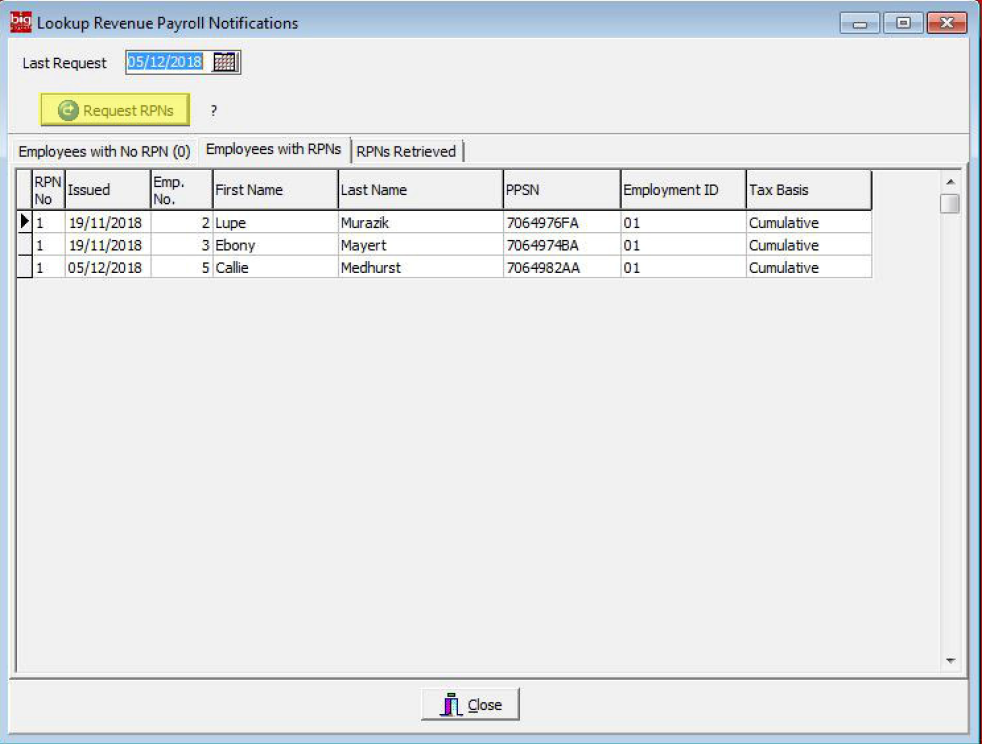
When you click on RPN Lookup it will open another window “Lookup Revenue Payroll Notifications”
Click on the button “Request RPNs” (Following are example names and PPSN)
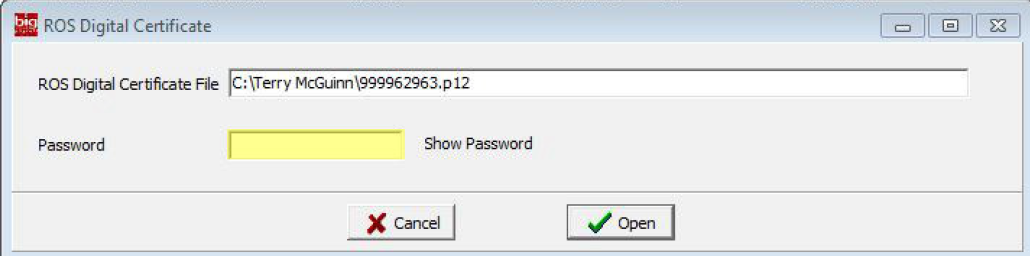
A window will open requesting you ROS password, so it can connect to ROS and retrieve RPNs

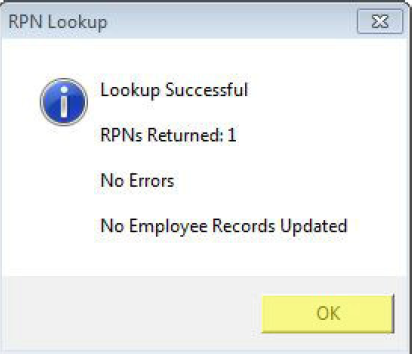
You will get confirmation screen like the one below. Once there are no errors you can click “ok”

Performing a Payroll Run
Processing a Payroll Run
1. Requesting RPN
When you submit you first pay run for 2019 Revenue will update Employment IDs from the pay run information. When
you lookup RPNs again an updated RPN (with Employment IDs) will be returned for each employee. From then on RPNs
will be returned only for employees where there has been a change.
When doing your pay-run the first step is to request your RPN’s from Revenue. To request your RPN’s click on RPN
Lookup.

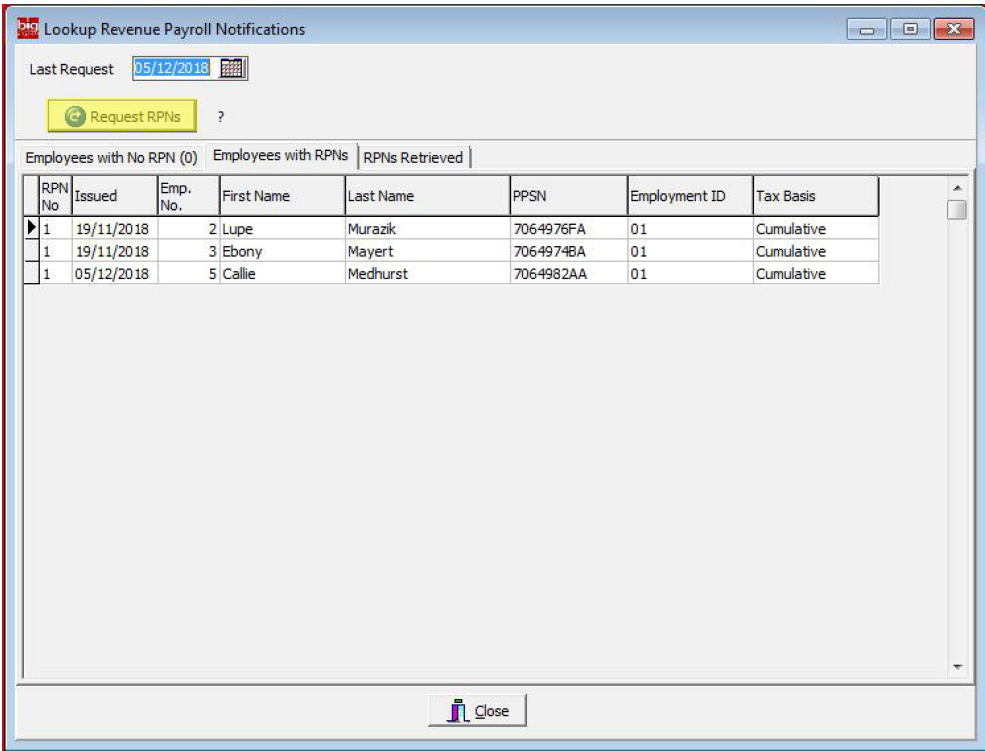
When you click on RPN Lookup it will open another window “Lookup Revenue Payroll Notifications”
Click on the button “Request RPNs” (Following are example names and PPSN)
A window will open requesting you ROS password, so it can connect to ROS and retrieve RPNs.
You will get confirmation screen like the one below. Once there are no errors you can click “ok”
2. Timesheets
Next you will proceed to “Timesheets” this is where the hours are entered for the pay period.

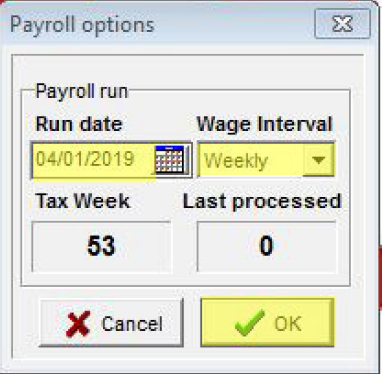
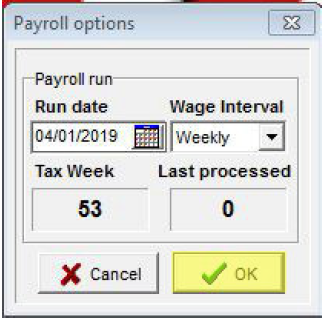
It will request the Run Date. The Run date is date you are running your payroll for. It is recommended that you pay on
the same day on weekly and fortnightly pay runs.
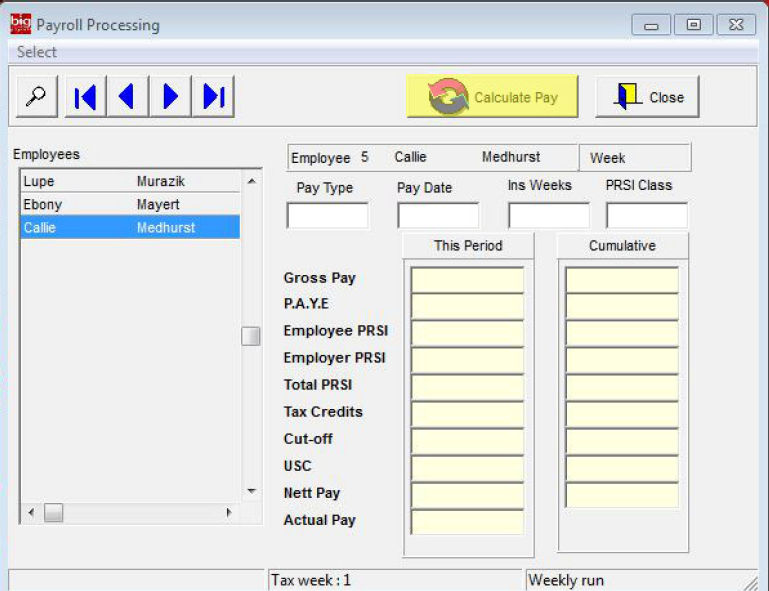
In the time sheets window your employees will appear along the left and the wages details will be on the right.
All current employees for the type of payroll chosen on the previous screen are listed, in this case weekly.
If you have setup ‘Auto Update’ payments for employees you can click on the Auto Update button to update the Time
Sheets.
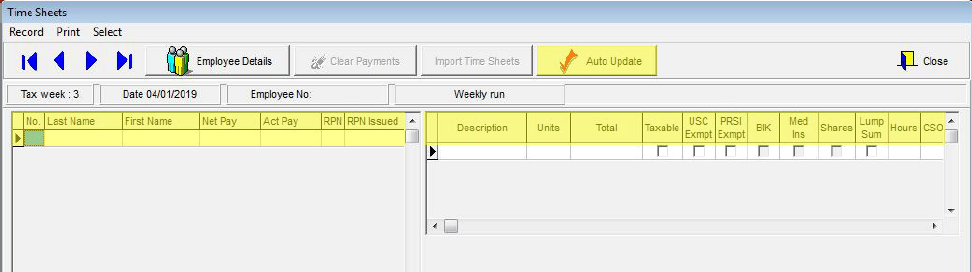
To make changes or enter data for individual employees, select the employee required on the list then click on the
description box and choose a payment type Rates of Pay. Use the tab key to move to the units column and enter the
number of units e.g. 1 Salary or 39 Hours.
Hours and CSO Type should also be entered, this is not required but is important if you need to complete the Earning
Hours and Cost of Employment Survey. If you have setup ‘Hours Factor’ and assigned CSO Type to Rates of Pay this
data will automatically display.
Press the tab key again and the program will calculate the gross pay.
Press the Insert Key to enter another pay category for this employee or press CTRL+N to enter pay details for another
employee. Continue until all employees have been completed. Alternatively, you can use the new Auto Update
feature, this will update the timesheet based on the details you have entered in the Auto Update section on the
Employee Details main tab.
You can then click “Close” to move onto the next step.
NOTE: To Clear payments for an employee, select the Employee name and click on the Clear Payments Button
3. Processing the Pay-Run
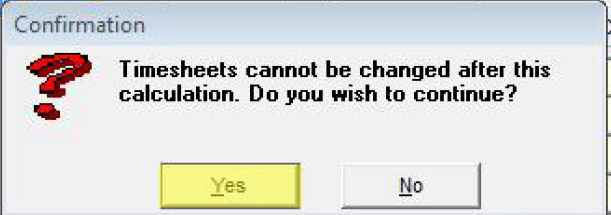
Once you have closed out of timesheets the next step is to “Process” the wages.

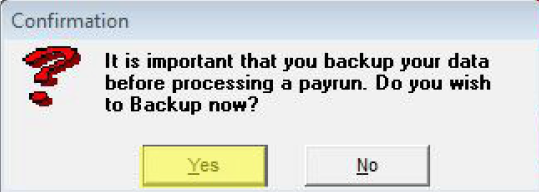
Backing Up
When you click on process the first window to come up is “Confirmation” window requesting you do a backup. It only
takes few seconds and is highly recommended click “Yes”
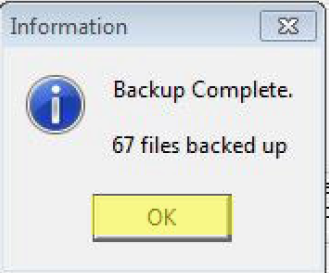
Once you have clicked yes it will open another window giving you an opportunity to save it to any location you require,
or you can allow it to default.
Click “Start Backup”

Once backup is completed you will get the following window click “OK”
A new window will open confirming your run date.
This should be the same as what you used for your times sheet in step 6
Click “OK”
In the payroll processing window click on “Calculate Pay”
It will look for confirmation by clicking “Yes”
4. Payslips
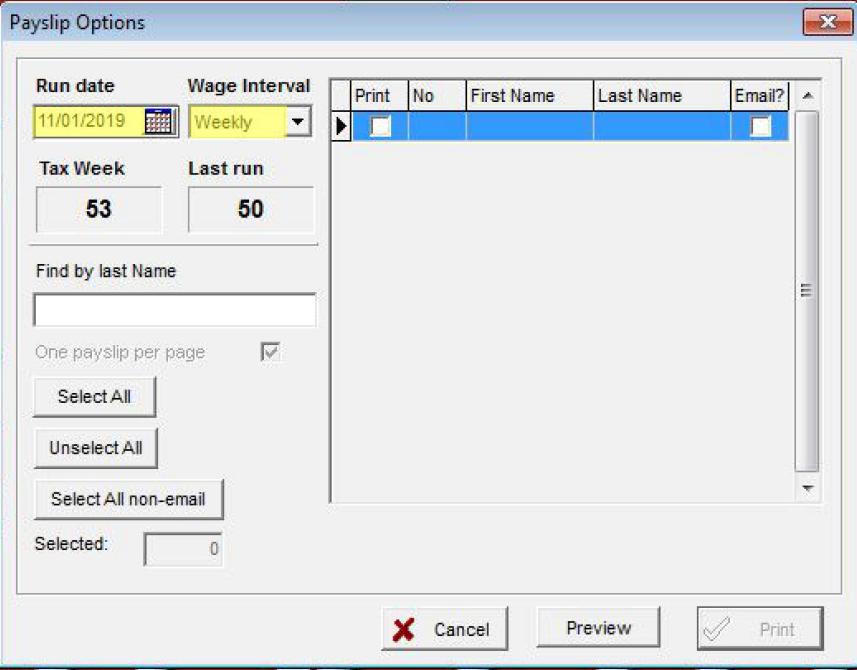
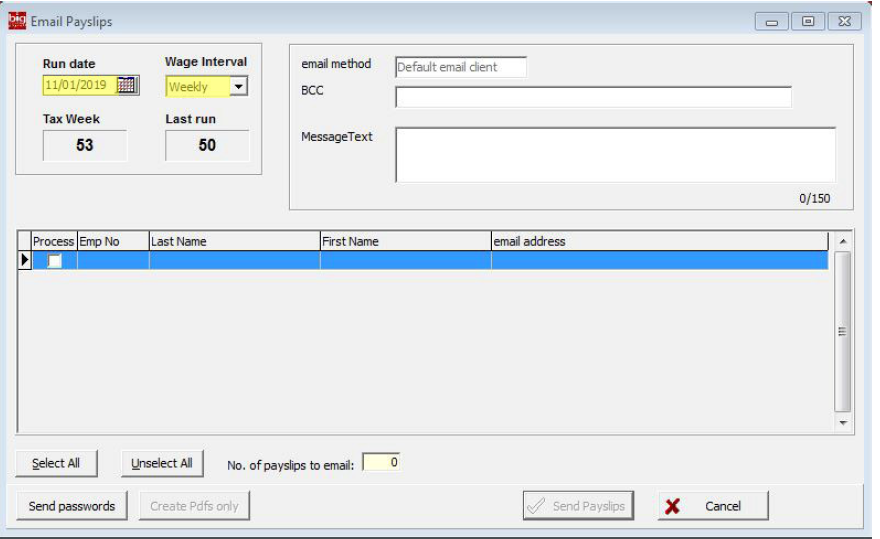
Payslips can be printed or emailed. If you wish to Print click on Print Payslips

When you click Print payslips you then need to enter the “Run Date” and “Wage Interval”
When you click on Email payslip you need to enter the “Run Date” and “Wage Interval”
Submitting a Payroll Run to ROS
Submitting pay Run to ROS
Submission must be done on or before you pay employees.
Please note that this is a statutory Submission “Similar to a P35”
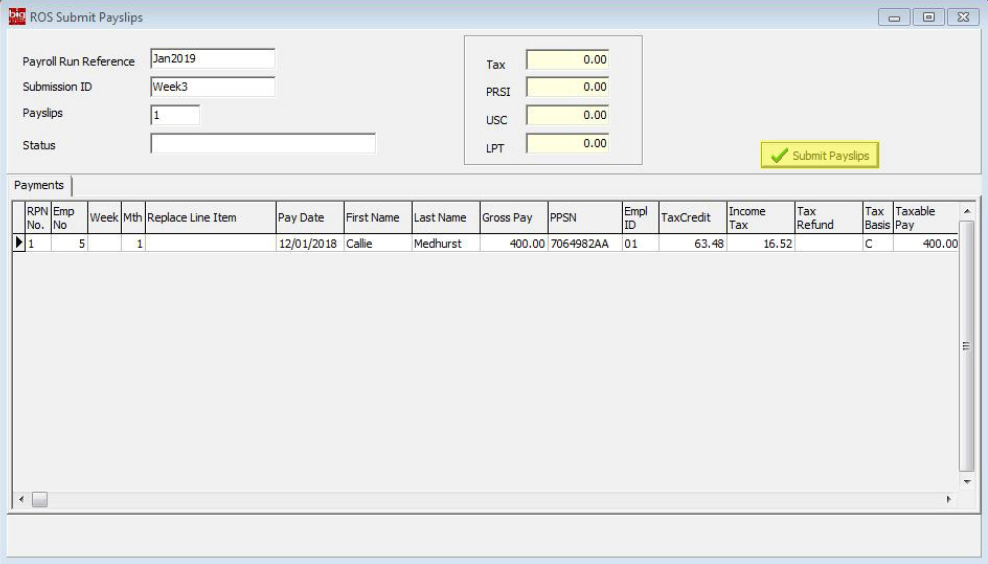
To submit a pay run, click on “Submit Payrun” Button

In the next window it will look for:
- Payroll run reference: This can be the month and year example Jan19
- Submission ID: This can be the week number
It will list all payslips to be submitted to ROS, this is final chance to review before clicking “Submit Payslips”
We would recommend you process and send payslips in advance of payment being made so any errors can be rolled
back/corrected before making a statutory submission to revenue.
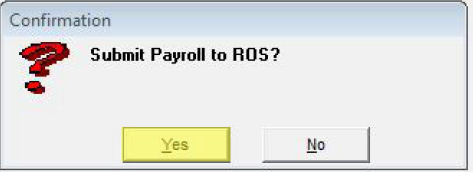
It will pop up a confirmation window click “Yes” if you are happy to proceed.
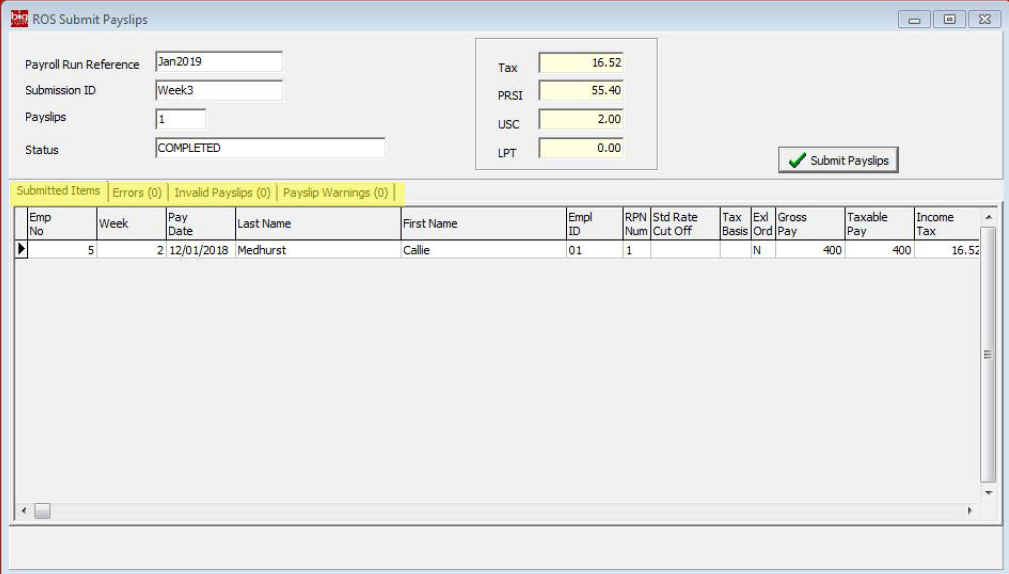
You will then get message “Payroll Submission Successful”
Click “OK”
If there are any errors with submission they will appear on the following screen
Adding new employee
Adding new employee
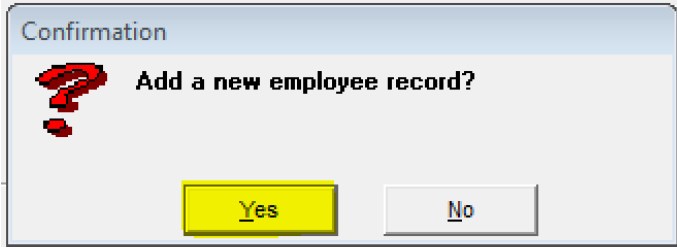
1. In payroll go to employees and click on the Blue arrow on the left.

2. You will get message “Add a new employee record?”
Click “Yes”
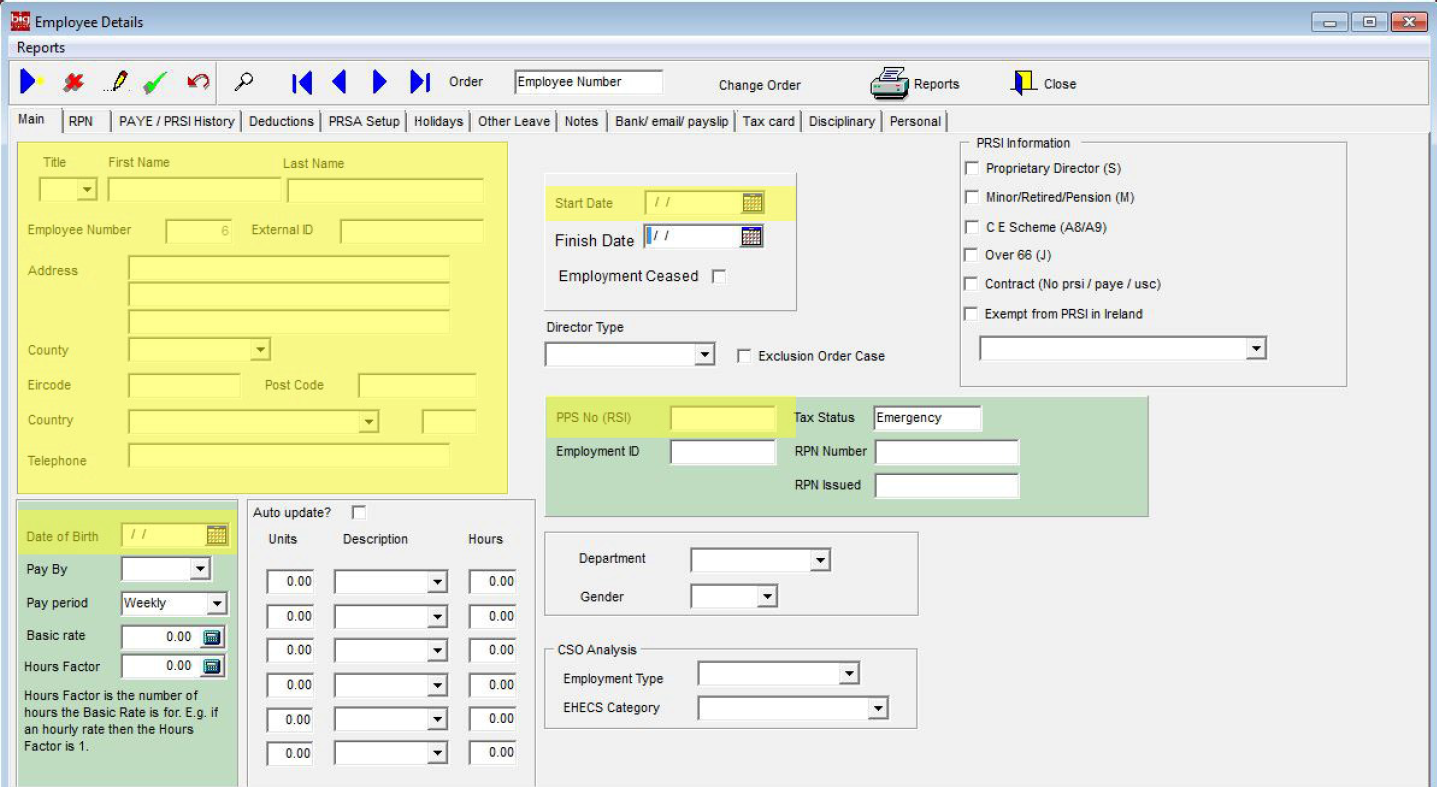
3. You will now have blank employee page
From 2019 if an employee has never worked in Ireland they will need to register with revenue directly and they will
need to notify revenue who they are working for. This is including students that have never worked.
If you have no PPSN for new employee it is important that the following is filled in, it is recommended that following be
filled in regardless.
Details that need to be filled in are Name, address, Start Date, DOB and PPSN if applicable.
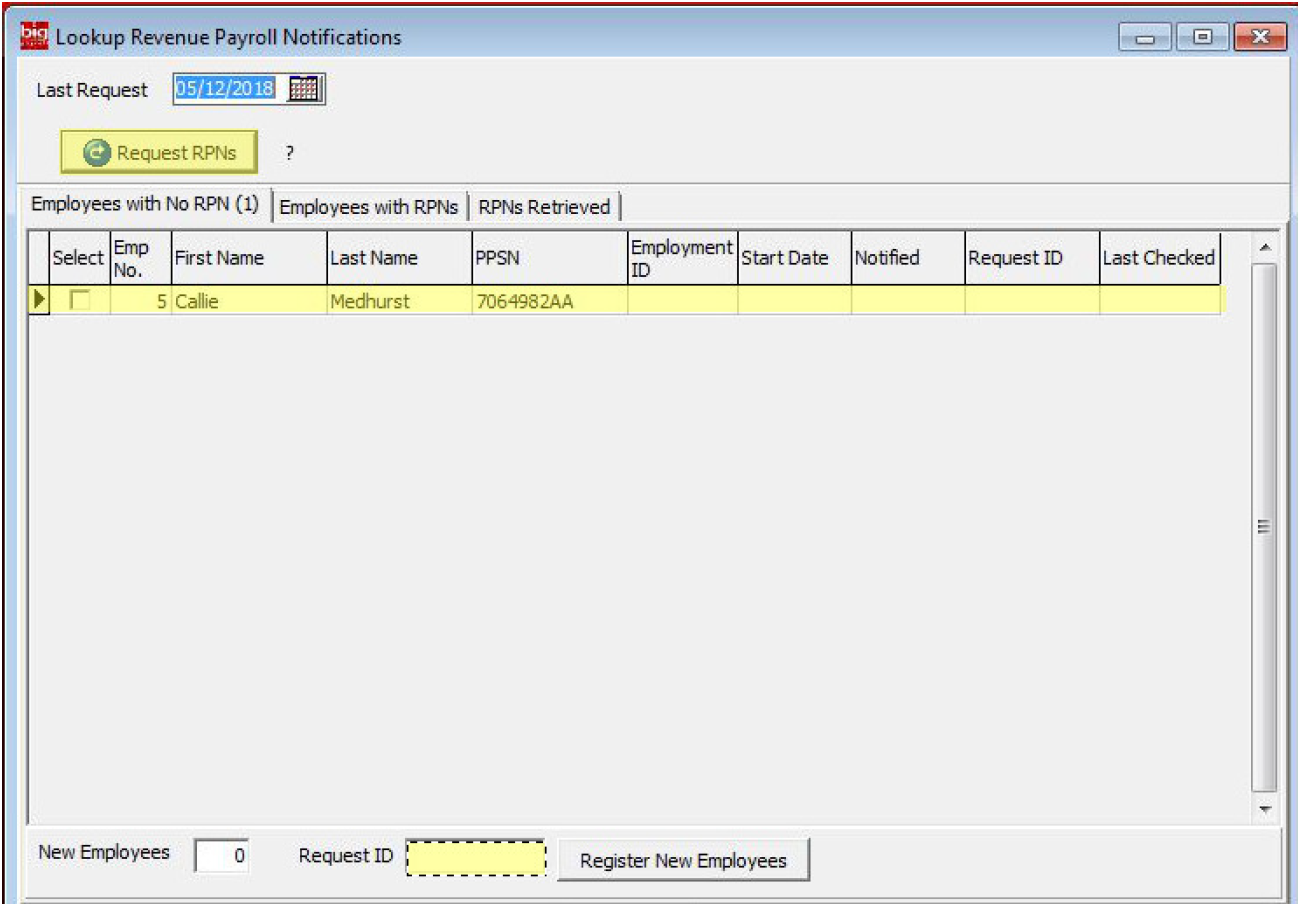
4. The next step now is to retrieve your new employees RPN’s. To this click on the “RPN Look Up” button
5. Once the employee is setup got to RPN lookup.
Click on request RPNs it will return all available RPNs for any employees
If any new employees do not get RPNs you can then Register New Employee.
Input a Request ID it will accept number and letters or both and needs to be unique every time it is used.
If the employee has no PPSN they will be on emergency until such time that they do get RPN.
6. A new window will open displaying “Lookup Successful” and should tell you RPN’s returned and employees updated.
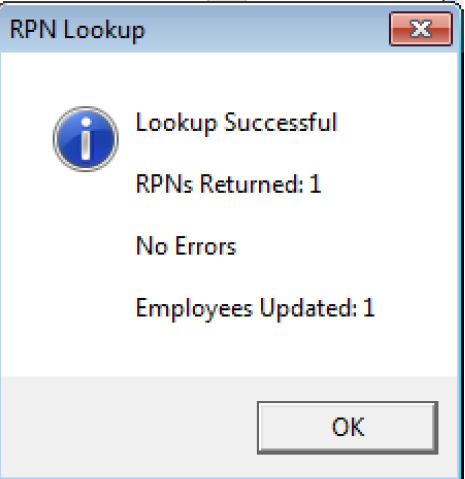
You will now be able to process the wages as normal with the new employee.
Ceasing an Employee
Ceasing Employee
From 2019 P45’s will no longer accepted by revenue. But the new method is far more seamless method of ceasing
employees.
1. When ceasing employee in 2019 first you need to complete your final pay run for the employee/employees.
When doing the times-heets be sure to enter all payments for the employee that is leaving including holidays as when
you submit it to revenue it will be final.
Once you have completed the final pay run go to the employee/employees in employee details and enter
the finish date and tick the employment as ceased.
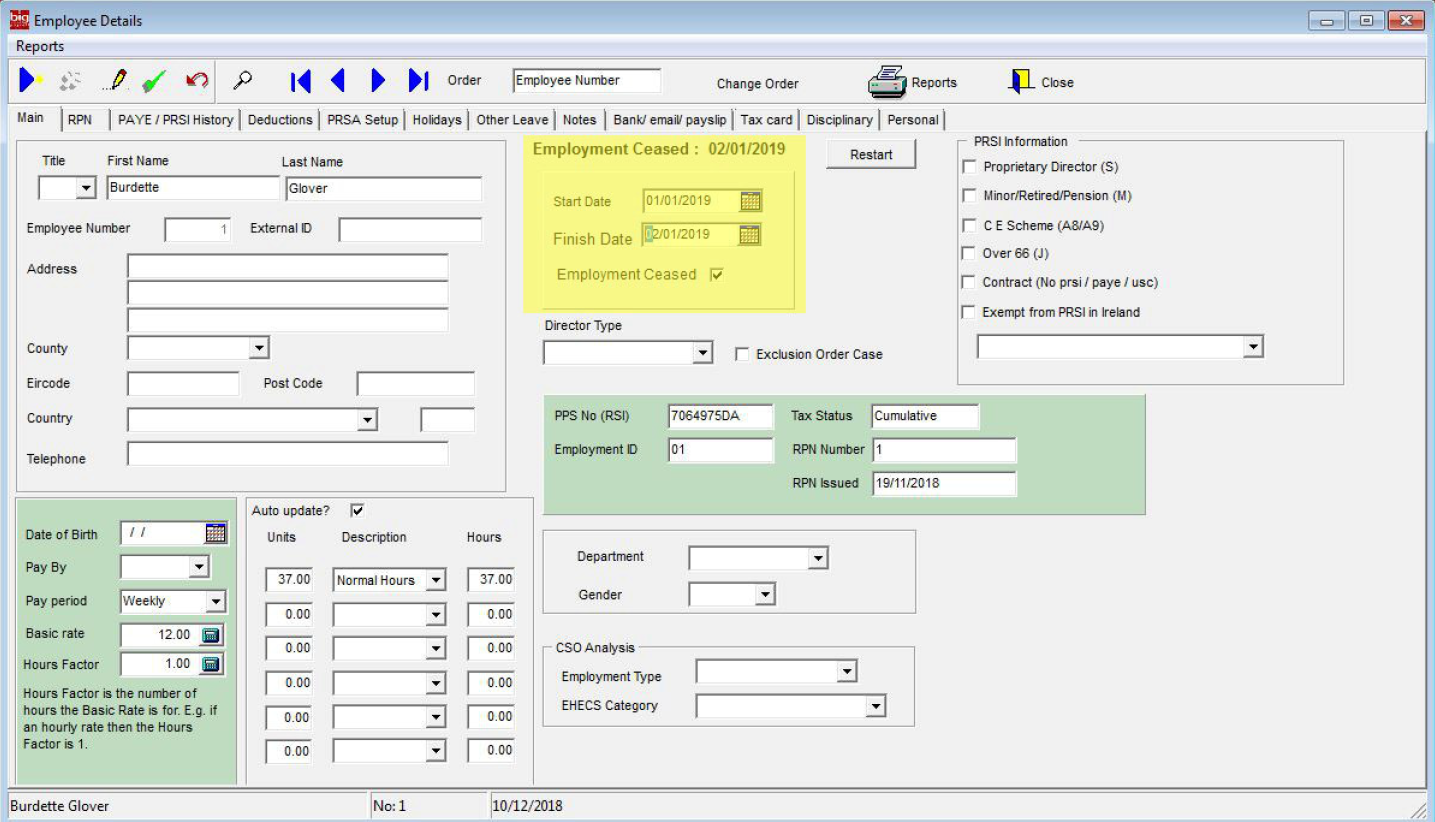
2. When you submit your return to revenue the return will give back the “Cease Date” for employees who’s
employment has ceased.

That is the employee ceased from your Payroll and ROS notified.
Performing a Rollback
Rollback
If you haven’t submitted your pay run to Revenue, it is still possible to go to utilities do rollback and then process
wages again with corrections.
But if the Pay Run has been submitted to Revenue there is a new process on top of the standard rollback.
Standard Rollback
To do Rollback on week that has already being processed go to utilities and Rollback
Highlight the employee and the week you want to rollback by getting the arrow to point at the relevant employee
and week.
Then click on Rollback if it hasn’t been submitted it will simply delete that week and you can process it again.
If it has been submitted, you will be given two options.
Replace or Delete
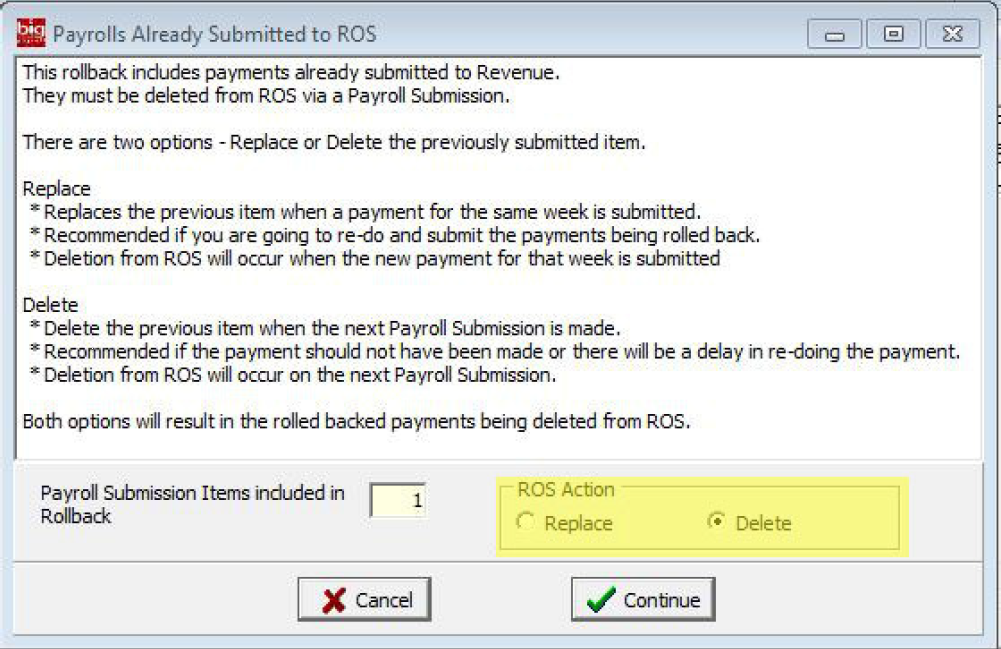
You will use the Replace option for
* Replaces the previous item when a payment for the same week is submitted.
* Recommended if you are going to re-do and submit the payments being rolled back.
* Deletion from ROS will occur when the new payment for that week is submitted.
You will use delete for
* Delete the previous item when the next Payroll Submission is made.
* Recommended if the payment should not have been made or there will be a delay in re-doing the payment.
* Deletion from ROS will occur on the next Payroll Submission.
Rollback delete option
If you choose to delete the record there is nothing else to be done as you are telling Revenue that record shouldn’t
have been done in first place.
Rollback Replace option
If you are doing a Replace you will need to process the wage again.
When you go to submit the corrected pay run there is a column called “Replace Line Item” it will have the Line Item
ID that is being replaced. (This ID is generated automatically by the system).
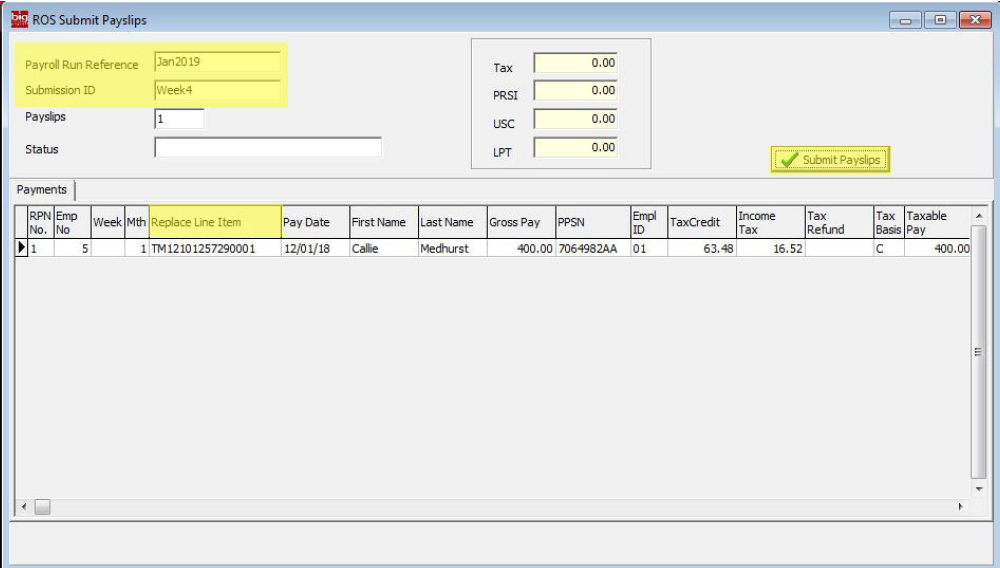
You will also need to give it a new submission ID as this new to be unique every time.
So for example you could use same submission key used previously but add letter R at the end to indicate it is a
replace.
Please contact revenue for any queries not related to Big Red Book software.
ALL REVENUE QUERIES MUST BE DEALT WITH BY REVENUE.
Important Revenue Contact Details
Please note that Big Red Book as the supplier of your Payroll Software will provide information on how our Software works.
For all other Payroll related information please contact Revenue on one of the numbers:
provided below (eg: cut offs, credits, tax cert info etc..)
• www.revenue.ie – This website contains a range of tax information, services, forms and leaflets.
• Revenue Employer info/Customer Service Unit 1890 25 45 65 or employerhelp@revenue.ie
• Payment of tax or pay related social insurance contributions 1890 203070
• Lodgement of end-of-year returns 1890 203070
• PRSI Queries relating to social insurance aspects of the system + 353 1 704 3000
• Technical queries concerning Revenue on line services 1890 20 11 06 or roshelp@revenue.ie
• Tax queries on the operation of PAYE – 1890 25 45 65 or + 353 67 63400 or employerhelp@revenue.ie
• Central Statistics Office (CSO) – (LoCall)1890 313414 or +353 21 4535000 or email ehecs@cso.ie


