1. RPN Lookup

Click on  to request RPNs from ROS or notify ROS of new employees.

Clicking RPN Lookup will run the default Lookup immediately, initially requesting the ROS password, if the last lookup date is earlier than the last business day.

The Last Request date will initially be set to 01/12/2018

Initially all employees will appear in the list of ‘Employees with No RPN’

Click on  button to request all RPNs issued since the last issue date.

RPNs will be returned for all employees registered for you with ROS and these will be move to ‘Employees with RPNs’

Notifying Revenue of New Employees

If there are employees that are not registered with ROS they will remain in ‘Employees with No RPN’ tab.

Any employees not registered with ROS for you can now be registered.

In order to register a new employee they must:

  1. Have a PPSN and have been assigned an Employment ID.
  2. Have previously been registered for employment with Revenue.

At the bottom of the list of Employees with No RPN, enter a ‘Request ID’.
This is a unique reference for this notification – this can be any combination of letters or numbers.

Click on Register New Employees to register these employees.

An RPN will be returned for all employees except where an employee has never worked in Ireland and so is not in the Revenue system.

In the case of employees taking up their first employment they must register themselves for your employment via myAccount.

Once they are registered with Revenue an RPN will be returned when you do a check.

2. Timesheet Entry

Click on the Timesheets Icon to begin entering payroll information. The Tax Week/Month dialog is displayed. Choose the payroll date by typing the date in the box or click on the small calendar button to display a calendar. Use the tab key to move to the Wage Interval box and choose the wage interval you wish to enter (Weekly, fortnightly, monthly).

At this point the Tax week/month to be entered will be displayed in the left-hand box and the Tax Week/Month that payroll was last processed will be displayed on the right-hand box.

Click on OK to continue. This will display the main Time Sheets screen. All the current employees for the payroll period chosen on the previous screen will be listed, in this case weekly.

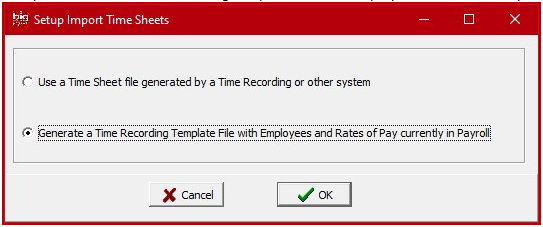
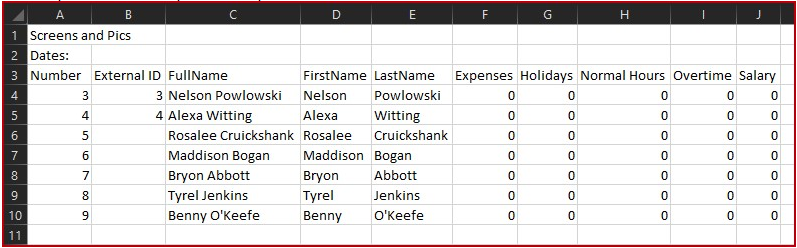
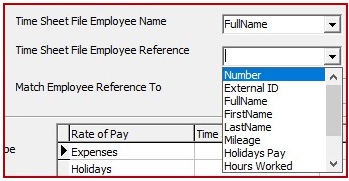
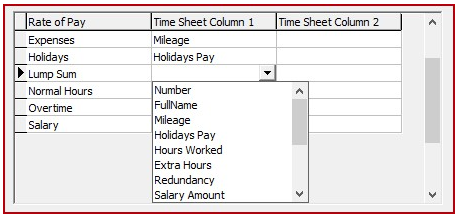
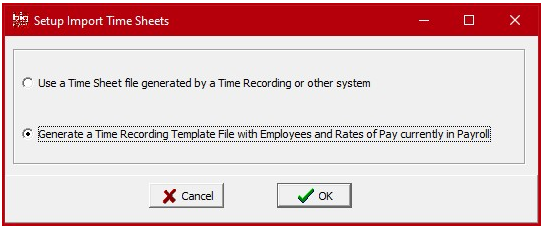
Importing Timesheets: 
Further information regarding the facility to import timesheets from third party software or a custom CSV file can be found here.

Auto Add Timesheets: 
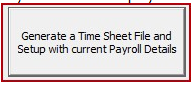
If you have setup ‘Auto Add Time Sheets’ for employees you can click on the ‘Auto Add Time Sheets’ button to update the Time Sheets with the information entered in the Employee Details Main tab.

Manually Adding Timesheets: 
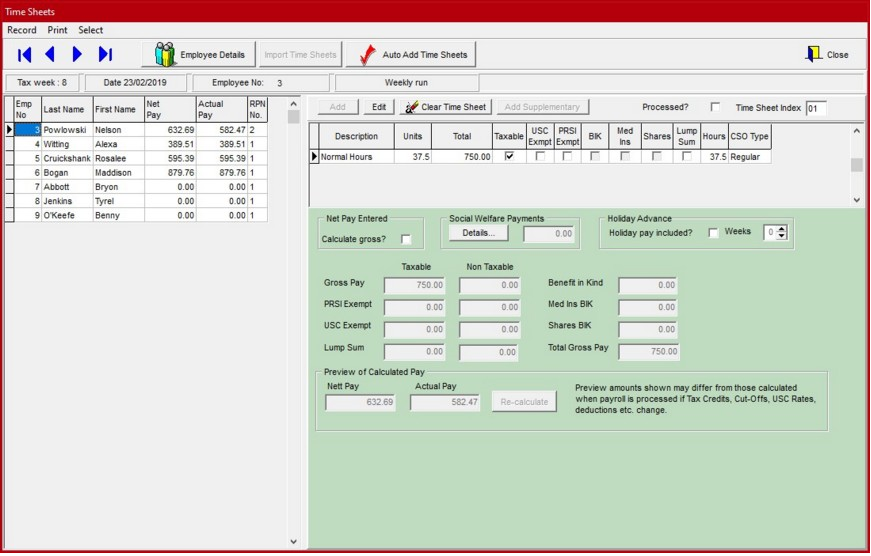
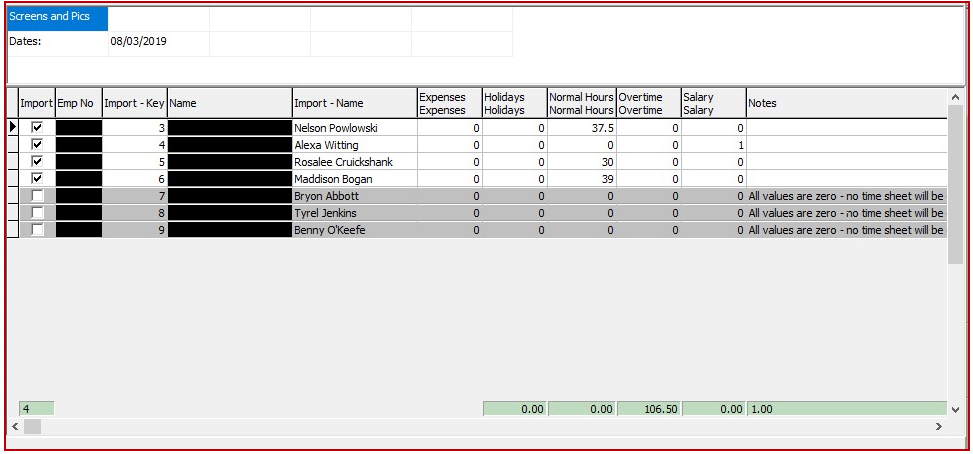
To manually enter data for individual employees without using the ‘Auto Add Time Sheet’ fetaure, select the employee required on the list, click on the ‘Add’ button and then click on the description box and choose a payment type Rates of Pay. Use the tab key to move to the units column and enter the number of units e.g. 1 Salary or 39 Hours.

Edit Unprocessed Timesheets: 
To make changes for individual employees, whether imported, entered ‘Auto’ or manually, select the employee required on the list, click the ‘Edit’ button and then click on the description box and make your changes. This can only be done when the Timesheet has not yet been processed.

Hours and CSO Type should also be entered, this is not required but is important if you need to complete the Earning Hours and Cost of Employment Survey. If you have setup ‘Hours Factor’ and assigned CSO Type to Rates of Pay this data will automatically display.

Pressing the ‘Re-calculate’ key after manual entry or changes will calculate the gross pay.

Press the Insert Key to enter another pay rate for the current employee or press CTRL+N to enter pay details for the next employee in the list. Continue until all employees have been completed.

NOTE: To Clear unprocessed payments for an employee, select the Employee name and click on the ‘Clear Time Sheet’ button

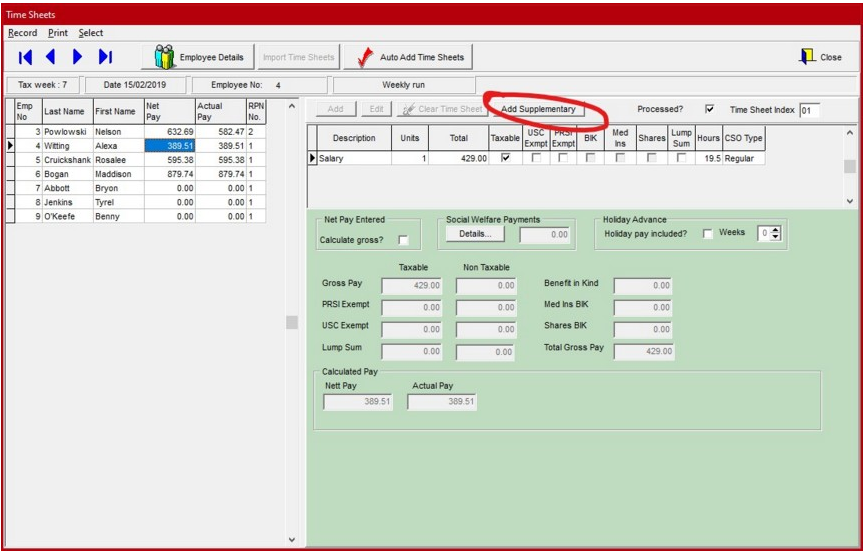
Net To Gross Facility: Net Pay Entered

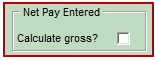
When this box is ticked, the amounts entered on the timesheet for that particular employee are deemed to be Net (ie after Tax, PRSI etc. have been deducted). When this option is ticked the gross is calculated so that the net amount arrived at, this happens when the timesheets are Processed. Net to Gross can also be selected when entering details for ‘Auto Add Time Sheet’ in the Employee Details Main tab.

Holiday Pay Facility :

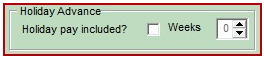
If an employee is on holidays for more than one payrun, tick the Holiday Pay Included Tickbox, and enter the number of weeks holidays in the box shown. This will allocate tax credits and PRSI weeks for the holiday weeks, and the employee will not be processed for the holiday weeks set. This feature allows for the processing of pay for employees going on holidays in one week, rather than processing future payruns for each week of holidays.

Social Welfare Payments:

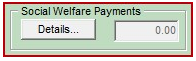
The total amount of Social Welfare Payments (e.g. Illness Benefit) included in a pay run is shown in the Social Welfare Payments panel. To enter or change Social Welfare Payments click on the Details… button

You can then enter Non-taxable Illness Benefit to be processed and indicate whether or not employee keeps the cheque for the benefit from social welfare.
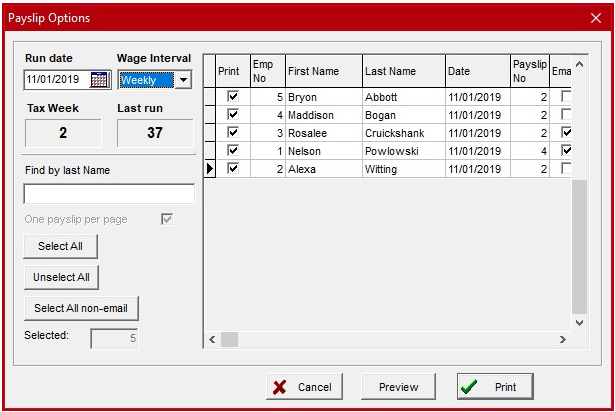
3. Supplementary Payments

Supplementary Payments will not be added to the PayPath file and should be paid in a different manner.

When it is required to make more than one payment in the same pay period, a supplementary payment must be entered.

Go to Timesheets and enter the date you wish to make the supplementary payment for.

Supplementary Payments can only be made in the current or future pay period. It can also be made before or after the regular (Primary) payment.

Click on the employee you wish to make the supplementary payment for and click ‘Add Supplementary’ button.

A confirmation will display. Click ‘Yes’ to continue.

This will open a new timesheet. Select the rate of pay and enter the units and other details as you would for a normal timesheet. The example below shows a Supplementary Payment for €35 Expenses.

It should then be Processed and Submitted in the same manner as a normal payment.

4. Import Time Sheets Overview

Import Time Sheets is a facility to quickly update Time Sheets in Big Red Book Payroll using an external file with details of Employees and Hours Worked.

The format required for this file is CSV (comma separated file)

This type of file can be produced from a Time Recording System or a spread-sheet

The Time Sheet file must have:

  1. A row with headings to identify the data held in a column
  2. A column with a number or reference that matches the Payroll Employee Number or External ID.
  3. A column with the employee name (this is required to confirm that the employee is matched correctly)
  4. At least one column with the hours worked that are to be used in generating a Time Sheet.

The columns with hours worked are matched to the Pay Rates already setup in Payroll so the Time Sheets can be generated.

Example of an Import File opened in a spread-sheet:

Not using an external Time Recording System?

If you are not using a Time Recording System you can generate a template Time Recording file.

This will have all of your employees and a column for each Rate of Pay in your Payroll.

When this file is generated the settings for Import Time Sheets are also updated.

The template file can be used to records hours worked by employees that can be imported to update Time Sheets.

5. Setup with a Time Recording System

To setup the Import of Time Sheets go to Settings > Rates of Pay and click on ‘Setup Time Sheet Import’ button.

Unless Import Time Sheets has been setup previously you will be given two options:

  1. Use a Time Sheet file generated by a Time Recording or other system
  2. Generate a Time Recording Template File with Employees and Rates of Pay currently in Payroll

If you are not using a Time Recording System select the second option – see Setup Custom Import for details.

If you select to use a file from a Time Recording system the following message is displayed. Click ‘OK’ to continue:

A sample Time Recording File is required to setup the import as the system needs to read the file and allow you to specify which column has the employee number (or ID), the employee name and which are to be matched with Rate of Pay elements in Payroll.

An example of a CSV file opened in a spread-sheet:

In this example the Column Heading Line is Row 3.

You must enter the Column Heading Line number before you can read in the Time Sheet File

Enter the line number for the Column Headings Line and click on the ‘Open Time Sheet File’ button.

Select a Time Sheet CSV file. A sample file for the demo company is provided (StrikeItUpDemo_06-01-2019 .csv) and can be used with the demo company.

The Column Headings are displayed in line 3.

The Column Headings are now available to use to continue with the setup.

Set Time Sheet File Employee Name
This is the column heading for the employees’ names – this will be displayed when importing the Time Sheets to allow reassurance that the correct employee will be updated.

Click on button on the ‘Time Sheet File Employee Name to get a drop-down list of the Column Headings – in our example the column is ‘FullName’ – click on this to select.

Time Sheet File Employee Reference
This is the column heading to match with Employee Number (or External ID) that will link to Payroll.
Click on button on the ‘Time Sheet File Employee Reference’ to get a drop-down list of the Column Headings – in our example the column is ‘Number’ – click on this to select.

Match Employee Reference to:

The Employee Reference from the CSV file can be matched to either the Employee Number or External ID in Payroll.

Matching Time Sheet Columns with Rates of Pay

If you do not know which columns in the Time Sheet file are to be used in Big Red Book you are advised to enter Time Sheets manually using the information in the Import File to determine what columns you wish to use and what ‘Rate of Pay’ in Payroll they will be.

Click into Time Sheet Column 1. A dropdown list will be offered with the Rates of Pay in Payroll and you can match them with up to two columns from the Time Recording file.

As these fields are matched they are also displayed in the grid below. Also, the amounts for the first employee that will be used can be seen. This will assist in confirming that the correct columns from the Time Sheet File are being used.

When you are satisfied with the settings click ‘Save Import Setup’ then ‘Close’.

6. Setup Custom Import

To setup a custom Import of Time Sheets go to Settings > Rates of Pay and click on ‘Setup Time Sheet Import’ button.

Unless Import Time Sheets has been setup previously you will be given two options:

  1. Use a Time Sheet file generated by a Time Recording or other system
  2. Generate a Time Recording Template File with Employees and Rates of Pay currently in Payroll

When you choose ‘Generate a Time Recording Template with Employees Rates of Pay currently in Payroll’ and click OK a CSV file is generated with all the employees currently in Payroll and a column for each Rate of Pay.

The name of the file generated with default to the your company name + ‘_TimeSheets.csv’ – you can change the name before saving if you wish.

When the file is generated a message is displayed with the name of the Template File created and it’s location on your system.

You can open this file in a spread-sheet program like Excel and edit it as you wish e.g. you may not want all employees in the file or all the Rates of Pay in Payroll.

This file can be edited to record hours worked which can then be imported to update Time Sheets in Payroll.

When you subsequently open ‘Setup Time Sheet Import’ you will see the details of the setup.

Each Rate of Pay in Payroll will be matched to a column of the same name in the Time Sheet Template file.

If you later add employees to Payroll you will need to add them to this file also or generate the file again by selecting ‘Setup Time Sheet Import’ and clicking on the button

When you are satisfied with the settings click ‘Save Import Setup’ then ‘Close’.

7. Importing Time Sheets

To Import Time Sheets go to the Time Sheets for the period required in the normal way.

Click on ‘Import Time Sheets’ button to select the Time Sheet Import File.

The default location for the import files can be specified in Settings > Preferences.

Select the Time Sheet Import CSV file and click on ‘Open’

The details of the data to be imported are displayed.

If the file you have open is not the correct one you can select a different one by clicking the ‘Change Import File’ button.

The Import column on the left is checked when a Time Sheet in Payroll will be created.

If a match with an employee cannot be made a message is displayed in notes.

If a match is made but the Last Name of employee in Payroll is not in the Employee Name being imported a warning is displayed. The data will be imported but a check should be made to ensure the correct employee has been matched.

If a match is made but all the amounts to import a zero a time sheet will not be created for that employee.

The Totals to be imported are also displayed at the bottom.

If you are satisfied that the data is correct click button to import and generate Time Sheets.
A message is displayed asking you to confirm the number of Time Sheets to be added.

To complete the import select ‘Yes’.

8. Process Pay

IMPORTANT:
Make sure that all pay information is up to date and entered for all employees in the pay period to be processed. It is highly advisable that a backup is performed prior to processing.

Click on the Process icon  to begin processing pay.

You will then be prompted to Backup your data. Click Yes to run the Backup facility, Cancel if you have done so since you entered all you timesheets.

The Tax week/month dialog is then displayed. Choose the payroll date by typing the date in the box, or clicking on the small calendar button to choose from a calendar. Use the tab key to move to the Wage Interval box and choose the wage interval you wish to enter (weekly, fortnightly etc). Tip: Set the default wage interval in Settings > Preferences.

At this point the Tax week/month to be entered will be displayed in the left-hand box and the Tax week/month that the payroll was last processed will be displayed on the right-hand box. Click on OK to continue. This will display the Process Pay screen.

A list of employees who have a timesheet entered for the pay period selected will be displayed.

To process the pay for these employees, click on “Calculate Pay”.

You will be asked to confirm the calculation. Click ‘Yes’ to continue.

After this process completes, the Gross, Nett and Actual pay, PAYE, USC and PRSI information will be displayed for ‘This Period’ and ‘Cumulative’. Click on an employee name in the left hand column to view details for that employee.

9. Submit Payrun

Click on to submit your notification of payments to Revenue.

This must be done before or on the same day that employee will receive payment.

All payments processed but not submitted are displayed on the Submit Payrun screen.

Enter a ‘Payroll Run Reference’ – this is a way of grouping many Submissions. We offer the current month and year by default. This is a handy reference to use to track your submissions, but you may use something different if it suits your needs better.

Submission ID is unique for each submission. It defaults to the week number followed by sequential number e.g. ‘Week01_01’.

Tax, PRSI, USC and LPT will be blank, they will later display the total submitted following a successful ‘Check Payroll Submission’.

To submit the payment click on the ‘Submit Payslips’ button.

A warning is displayed that you are about to make a Statutory Submission and you are asked to confirm that you wish to continue.

If you wish to continue with the submission click ‘Yes.’

If it is the first time connecting with ROS in this session you will be asked for the Password for your ROS Digital Certificate.

The Submission is made and if there is an error an error message will be displayed.

On success a ‘Submission Successful’ message is displayed

Click OK

Payroll Submission Check
When a Payroll Submission is successfully run an ‘Payroll Submission Check’ is immediately made.

On successfully requesting a Submission Check a ‘Check Successful’ message is displayed.

A Payroll Submission Check will return a Status of either ‘COMPLETED’ or ‘PENDING’. If the Submission is Completed the summary amounts for Tax, PRSI, USC and LPT are returned and details of any Payslips that were rejected as ‘Invalid’ and Payslips that were accepted but had data that may need to be corrected e.g. the latest RPN may not have been used for an employee.

If the status is Pending then the payslips submitted have not yet been processed by Revenue and a Check Payroll Submission should be run later to get details of any Invalid Payslips that were rejected or Payslip Warnings.

Invalid Payslips
Invalid Payslips have not been accepted by Revenue and must be corrected and re-submitted.

If the correction does not require a re-doing (Rollback) of the payment e.g. invalid Cease Date then the details can be corrected and the Payment reset using Utilities / ROS Re-submit facility.

Post-Submission Backup
It is always a good idea to run a backup following Submitting Payments or Corrections. You will be prompted to run a backup after closing the Submit Payslips screen. Click ‘Yes’ to run the backup

10. Check Payroll Run

From the Main Menu choose ROS > Check Payroll Run.

This should be run when Payroll Submissions and Corrections are completed for a period, however it can be run as many time as required.

Details of Payments are retrieved and the Submission status of those payments is set to ‘Y’ for Confirmed.

A Check Payroll Run can be run at any time and should also be run following Replacement submissions.

It will return a summary of each of the Submissions made with that Payroll Run Reference and the Status of each Submission.

A Submission Status will be ‘Pending’ or ‘Completed’. If there are any Submissions with a Status of ‘Pending’ then ROS > Check Payroll Submission can be used to confirm they were ‘Completed’.

Check a Payroll Run

Select the Payroll Run Reference you wish to check from the list of Payroll Run References. Then click the ‘Check Payroll Run’ button.

Any warning relating to your submissions will be displayed. Click ‘OK’ to proceed. These warning will be recorded to review later if needed.

When a successful check is run a confirmation is displayed, click ‘OK’

In the submission tab, all submissions with the selected Pay Run Reference are then displayed with a summary for each submission.

All Payslips included the the Pay Run Reference are listed in the Payslips tab, each has a unique Line Item ID.

Click the ‘Close’ button to exit the Check Payroll Run screen.

11. Check Payroll Submission

From the Main Menu choose ROS > Check Payroll Submission.

This checks the Status of a given submission and return details of total Income Tax, PRSI, USC and LPT and details for Invalid Payslips and Payslip Warnings.

When a Payroll Submission is successfully run an ‘Payroll Submission Check’ is immediately made. If the Status at that time is ‘PENDING’ then ROS > Check Payroll Submission can be used to check it again. When the Submission is processed the Status returned will be ‘COMPLETED’

Select the Payroll Run Reference, then select the Submission ID from the drop-down list, then click the ‘Check Submission’ button.

On a successful connection with ROS and message is displayed. Click ‘OK’ to continue.

Summary Totals of the Submission are displayed – including the number of Payslips and Deletions.

Details of Invalid Payslips, Errors or Payslip Warnings (if any) for that Submission are also displayed.

Click the ‘Close’ button to exit the Check Payroll Run screen.

12. Print Payslips

Click on the ‘Print Payslips’ icon if you wish to Preview and Print payslips for employees.

Enter the ‘Run Date’ and the ‘Wage Interval’ for the set of payslips you wish to Preview and/or Print.

Double click the tickbox under ‘Print’ to change select/deselect the payslips you wish to print.

If you wish to exclude employees who are receiving payslips by email, simply click on ‘Select All non-email’.

Those with a tick under ‘Email?’ have an email address saved in Employee Details > Bank/email/payslip.

Click on ‘Preview’ to display the payslips on-screen, or ‘Print’ to print them directly from here, without preview.

Click on the printer icon to print the payslips.

13. Email Payslips

Click on the ‘Email Payslips’ icon if you wish to Email payslips for employees.

Choose the pay date and the pay interval. A list will be displayed of all employees with a Payslip for that period who have been setup for email (See here for details on how to setup an employee’s email address).

See Email Setup for details on how to setup sending emails.

You can click on ‘Select All’ to select email Payslips to all employees, or double click the tickbox in the ‘Process’ column to select/deselect individuals.

To add a message to the email enter text in ‘Message Test’.

Click on ‘Send Payslips’ button to email the selected Payslips.

Payslips are output in .pdf format. This is a widely used format for documents and can be read using Adoble Acrobat Reader, or any PDF reader software.

Each employee has their own email password, set in Employee Details > Bank/email/payslip, which will be required to open the file. Use the ‘Send Passwords’ button to send passwords to the selected employees.

Default Client

If you are using the ‘Default email client’ to email payslips the screen will appear as above. The email with the Payslip attached will be created in your email program, you will have to click on ‘Send’ for each employee.

SMTP Server

To send directly via your SMTP server you must first set up the Server Name in Settings > Email Setup, you must also specify a ‘From’ email address.

If your server requires authentication to send emails you must also enter the User Name and Password to login.

Using this method the emails will be sent without any further intervention on the part of the user but a copy may not be made in your email “Sent Items” folder.

Create PDFs only

If you wish to view the files that will be generated and emailed you can click on ‘Create PDFs only’. This will create the files in a folder called ‘Output’ in the folder that contains the Big Red Book Payroll (e.g. C:\Program Files\Big Red Book Payroll\Output).

The Payslip files are called ‘Payslip_Empno _.pdf’.

14. Reports

The last step in processing payroll is to run the relevant reports for the payroll processed from the Reports menu. Reports only make sense if all of the payroll for the date have been processed – ie weekly, fortnightly and monthly.

The available reports are:

  1. Period Summary – This will summarize the payroll for the month or quarter selected
  2. Weekly Tax Summary – This summarizes the payroll for the tax week selected, as well as offering an Accounting Summary, Employee Cost Summary as well as Deductions and Contributions
  3. Tax Deduction Card – This provides a tax card report for each employee
  4. Payroll Information – This report lists pay and bank information for each employee and can be faxed to your bank for direct pay or used to prepare payments
  5. Gross to Net – This summarizes the payroll for the tax week selected
  6. Pay Type Analysis – Summarize the payroll for a selected Pay Rate type and selected employees
  7. Deductions Reports –
    Employee – This provides a breakdown of deductions per employee.
    Analysis – This provides a breakdown of deductions by type.
  8. HR Reports
    Department Report – Shows the costing per employee for each department
    Holidays Report – Shows the holidays recorded on employee details holiday tab for each employee
  9. PRSA Reports – These reports give details of the PRSA contributions for employees
    Providers details
    Providers Summary
    PRSA Statement
    PRSA Summary
  10. Cash Analysis Report – This is a coinage report for employers paying by cash
  11. Employee Statements – This is a total payroll record for each employee

15. Check Period Returns

From the Main Menu choose ROS > Check Period Returns.


This provides a summary for each month with totals for each Pay Run Reference.

The Period Return can only be checked on date after the period (month) so initially there will be no months available to check.

Select the month and click ‘Check Period Return’ button.

When a successful check is made the Period Summary is updated and the summary for each Pay Run Reference is listed. Errors (if any) will be listed in the errors tab

Multi-Period Pay Run References
The ‘Multi’ column indicates if this is only a partial amount for the Pay Run Reference as the Pay Run Reference had payments for dates in other periods also.

16. Employee Reports

In Payroll 2019 a number of Employee Reports are available by clicking the Employee icon and selecting Reports from the menubar.

Create ROS List of Employees File
To align Revenue records with Employers and facilitate the transition to PAYE Modernisation in 2019 Revenue are requesting Employers to return a list of all current employees.
See ROS List of Employees

Current Employee List
A listing of all current employees.

Detailed Current Employee Report
A detailed report of all current employees.

Ceased Employee Report
A listing of all employees who have left in the current year.

PPS Nos. Missing or Duplicate
This is a report of all employees with no PPS Numbers entered or where the same PPS No. has been entered for more than one employee.

Other Payroll Support Topics

ERR Reporting

support-tick

Getting Started

emp-details

Employee Details Screen

support-cash

Payroll Processing

support-other

Employee Leaving

emp-cso

CSO EHECS Return

backup

Backups, Utilities & Support

misc

Miscellaneous