1. Creating a SEPA PayPath File

Choose ‘Create SEPA PayPath File’ from the Reports menu, this option will not appear if ‘Use SEPA’ has not been selected in Settings > PayPath.

You then select the Payment Date to generate the PayPath file for – You can choose whether you wish to run for Weekly, Fortnightly and/or Monthly.

A list is then presented with all employees of the selected payroll interval with the ‘PayPath’ (Direct Debit in earlier versions) method of payment and who have a payment processed in the latest payroll run.

To be included in the PayPath file an employee must have:

1. Payment due
2. Bank account name
3. BIC
4. IBAN

You cannot select an employee for inclusion if any of this information is missing.

To remove an employee from the payment file click on the check-box next to their name to unselect them.

A total for the PayPath transaction is displayed at the bottom of the screen.

When satisfied that all employees are included press the Next button.

The company’s bank account details are displayed. If any details are missing you must cancel and enter the details in Settings > PayPath.

File Reference
This must be unique for this file. The first 21 characters can be specified in Settings > PayPath – the date and time is appended to ensure it is unique.

Debit Date
This is the ‘Requested Execution Date’ and is the date you are requesting the bank to debit your account, payments will be credited to the employees accounts on the following day.

Please note that this is a change from the National Standard 18 system which debit and credited the bank accounts on the same day.

Narrative
Enter the Narrative, this will appear on the employee’s bank statement, unless a PayPath Reference has been entered with the employee’s bank details.

SEPA File Name
This is the name of the file to be submitted to the bank.

It must contain the words ‘PAIN001’, it will default to ‘PAIN001’ plus the date and time separated by underscores.

Click on ‘Finish’ to generate the file.

2. Std 18 PayPath File

Choose ‘Create PayPath File (Std 18)’ from the Reports menu, this option will not appear if ‘Use SEPA’ has been selected in Settings > PayPath.

You then select the Payment Date to generate the PayPath file for – You can choose whether you wish to run for Weekly, Fortnightly and/or Monthly.

A list is then presented with all employees of the selected payroll interval with the ‘PayPath’ method of payment and who have a payment processed in the latest payroll run.

To be included in the PayPath file an employee must have:

1. Payment due

2. Bank account name

3. Bank sort code

4. Bank account number

You cannot select an employee for inclusion if any of this information is missing.

To remove an employee from the payment file click on the check-box next to their name to unselect them.

A total for the PayPath transaction is displayed at the bottom of the screen.

When satisfied that all employees are included press the Next button.

The company’s bank account details are displayed. If any details are missing you must cancel and enter the details in Settings / PayPath.

Volume Serial Number (Identifier)
Volume Identifier is used to distinguish between multiple files submitted on the same day.
If you submit more than one file in a day the Volume Identifier should be unique for each file.

Payment Date
Enter/select the payment date

Narrative
Optional narrative for the bank.

Bank File Name
The name of the file to be generated defaults to Bankfl.emt, you may change this.

Bank File Location
Type in or select the location to save the newly created bank file. It is important to remember where you have saved the file.

Click on Finish to generate the file.

3. Switching to SEPA

The Single European Payments Area (SEPA) is a European initiative to standardize Euro currency electronic bank payments.

With SEPA, payments can be made to any bank in the SEPA zone.

BIC (Bank Identifier Code) and IBANs (International Bank Account Number) are now be used to identify a bank account instead of the Sort Code and Bank Account Number we have used up to recently.

BIC is no longer mandatory since 1st February 2016.

Steps for switching to SEPA:

1) Register with your Bank and receive a SEPA Originator Identifier Number (OIN) or SEPA Creditor Identifier to use when creating a SEPA PayPath file.

2) Update BIC and IBAN Codes for employees and company bank account. We have provided a utility to generate the BIC and IBAN from the Sort Code and Bank Account number already in use.

3) Select ‘Use SEPA’ in Settings / PayPath

4) Generate the SEPA PayPath file in the usual way.

5) Submit the generated SEPA Credit Transfer file to the bank. This will be different from the National (Standard 18) Payments System and your bank will advise on how SEPA files are submitted.

One notable change in operation is the ‘Debit Date’ – this is the date that funds are debited from your account, they will be received in the employees account the next day. In the national payments system funds were debited from you account and credited to the employees’ accounts on the same day.

For more detailed information about SEPA please contact your bank and see https://www.ecb.europa.eu/paym/integration/retail/sepa/html/index.en.html

4. Generating BIC and IBAN

If you have bank account details already entered for employees we have provided a utility to generate BIC and IBAN codes from the employee’s Sort Code and Account Number.

In Settings > PayPath click on the ‘Generate BIC and IBAN Codes’ button.

There may be a small number of accounts for which a BIC and IBAN cannot be generated. These are reported after the update is run and can be obtained from the Sort Code and Account Numbers by clicking on the link on the screen.

Click ‘Report’ to get a Report of the changes made

Click ‘Update’ to finish the process

5. Processing Week 53

Week 53

For weekly and fortnightly paid employees a ‘Week 53’ pay day will occur when a pay day falls on the 31st December 2018.
In this case the week/fortnight will be processed on a week-one basis with the normal tax credits and cutoff points given for that week/fortnight which may mean additional tax credits and cut-offs being given in addition to the annual credits and cut-off points.

This applies for PAYE and PRSI.

USC in Week 53

USC may be levied on a Week One basis with the normal weeks cut-offs granted but only if there has been no change to the normal pay day in the current or previous year.

As the system cannot determine if an employee is entitled to additional USC cut-offs for Week 53 there is now a facility to indicate if ‘USC Week 53’ applies in Week 53 – see ‘USC in Week 53’

The following are excerpts are from Universal Social Charge – Frequently Asked Questions (FAQs) at http://www.revenue.ie/en/tax/usc/

Note:
The additional USC cut-off points do not apply where, an employee in continuous employment, (who is weekly, fortnightly, or 4-weekly paid), changes their normal pay date either during the week 53 year or the previous year. Where such a change occurs the employer should apply the instructions provided in the (2012 – 2014) table.

However, in a situation where an employer operates more than one payroll which have different pay dates and an employee in continuous employment with that employer changes payroll in normal situations (such as changing department, etc.), the arrangements set out in the preceding paragraph should not be applied.

As ‘Week 53’ occurs very infrequently an employee in normal circumstances should not have a Week 53 applied in consecutive years. However, in some cases it may occur legitimately. For example, a fortnightly-paid employee moves to weekly-paid on promotion in 2016. They received a ‘Week 53’ (Fortnight 27) in 2015 and will also have a Week 53 in 2016. In this situation the employer may apply the Week 53 in 2016 even though the employee changed their pay date in the year.

6. USC in Week 53

When Week 53 / Fortnight 27 is selected in Time Sheets a check is made to try to determine if the pay day has changed from the last pay day e.g. if the last pay day was Sunday (25th December) and the date entered is Saturday (31st December).

If the day of week has changed a warning is displayed that changing the pay day at year end can cause problems when entering payments for week one in the next year.

As the treatment of USC in week 53 is conditional a facility has been provided to indicate on what basis USC should be calculated.

On selecting Week 53 / Fortnight 27 information on USC and Week 53 is displayed.

A list of employees is then displayed with the facility to select / unselect all or individually for ‘USC week 53’

To continue to the Time Sheets click on ‘Update’ to apply the settings to employees or ‘Cancel’ to cancel changes.

Click on the ‘USC Week 53’ button on the menu bar to re-access this option in Week 53.

7. Gmail App Password Setup Payroll

If you are using Gmail for sending invoices and Statements from the 30th of May 2022 Gmail will no longer support less secure apps.
Up until now most of us would have been using less secure apps to send invoice and statements via Big Red Cloud, Big Red Book or Big Red Book Payroll.

Gmail is making these changes to make everyone’s emails more secure.
To continue using Gmail for sending your invoices and statements you will have to turn on 2FA (2 Factor Authentication). With 2FA enabled you will be able to turn on app passwords, app passwords gives you the ability to assign a specific password to a particular software or device for connecting to your email and send an invoice or statement on your behalf.

For more information on 2FA and app passwords use the following Google help pages.
2FA
https://support.google.com/accounts/answer/185839?hl=en&co=GENIE.Platform%3DDesktop&oco=0
App Password
https://support.google.com/accounts/answer/185833?hl=en

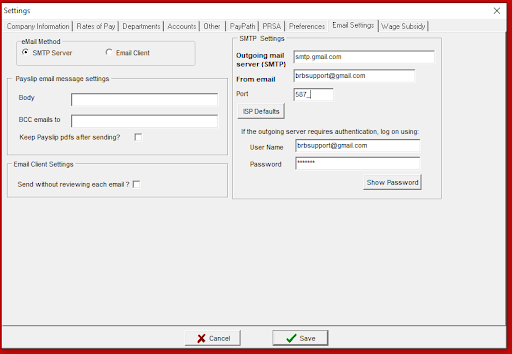
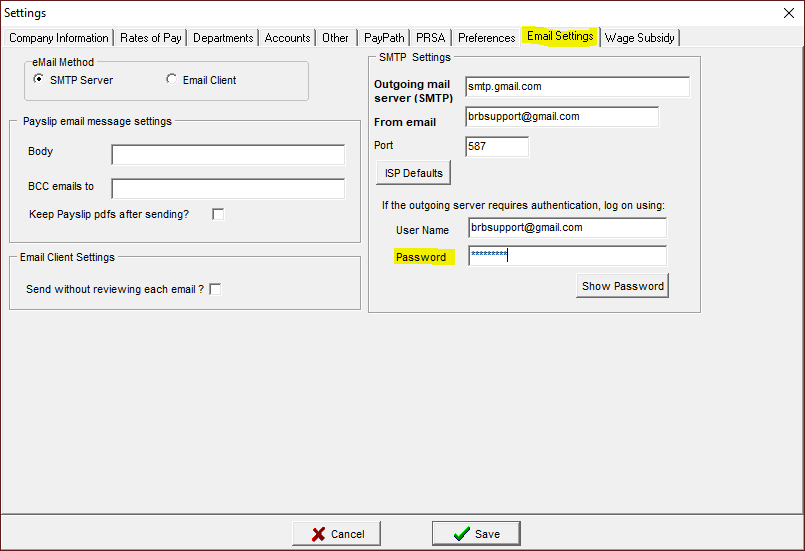
If you are unsure if you are using Gmail or not go to settings, and email settings.
In the window the SMTP will be set to smtp.gmail.com if you ae using Gmail.

To check if you are still using Less secure apps for sending your emails via Gmail go to your google account settings.
You can do this by clicking on your initials or company logo when in Gmail or google search page

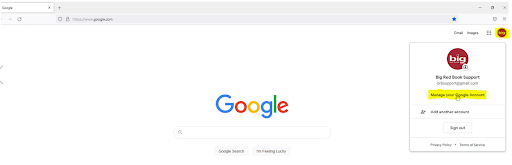
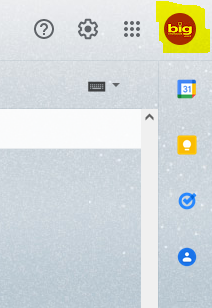
When you click on the logo or initials you get the option “Manage your Google account” Click on it.

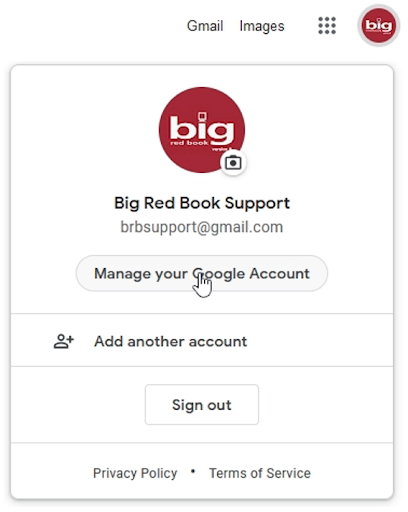
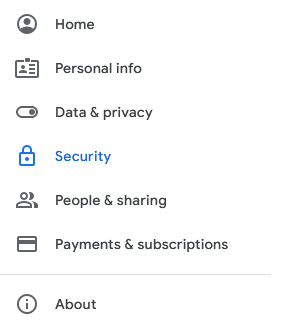
When the new window opens you will have list of options along the left.
Select the option for Security.

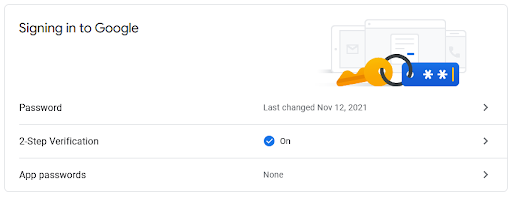
Once the page loads scroll down to “Signing in to Google” if the option for App password is there you have already gotten 2FA on and may not need to go any further if the option for App Password isn’t there scroll down to the Section “Less Secure app access”

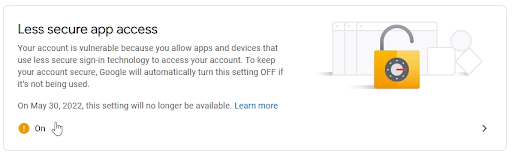
It is most likely turned on if it is On you will need to turn 2FA.

On the Security page again near the top you need to go to the “Signing in to Google” section.

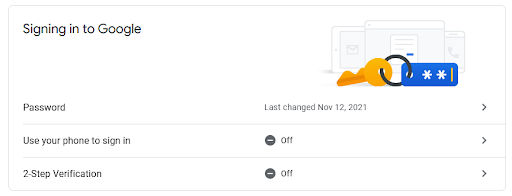
Click on the “2-Step Verification” button.

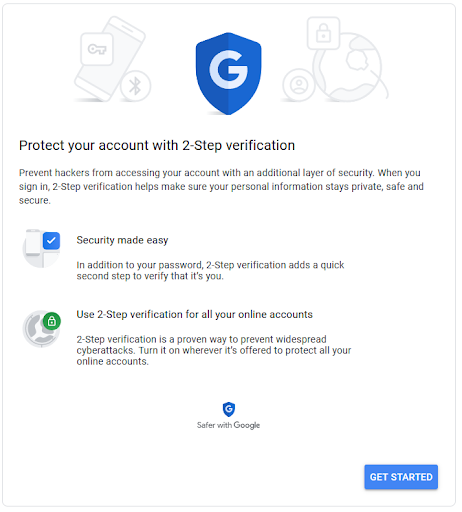
You will get a conformation message asking to confirm you wish to proceed with turning on 2FA
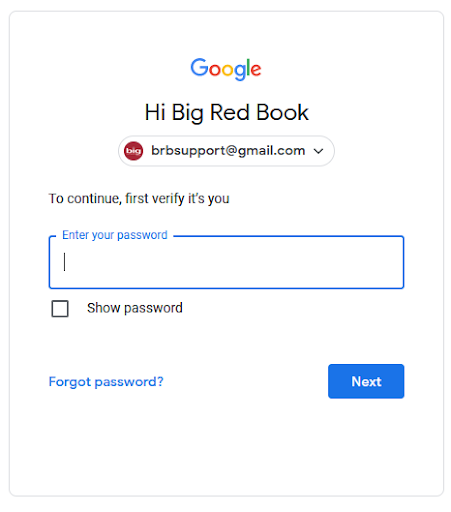
On the Next window you will need to enter your Gmail password.

Next it will look for a landline or mobile number to send a text or Voice call with a 6 digit code that will be needed for the next step.

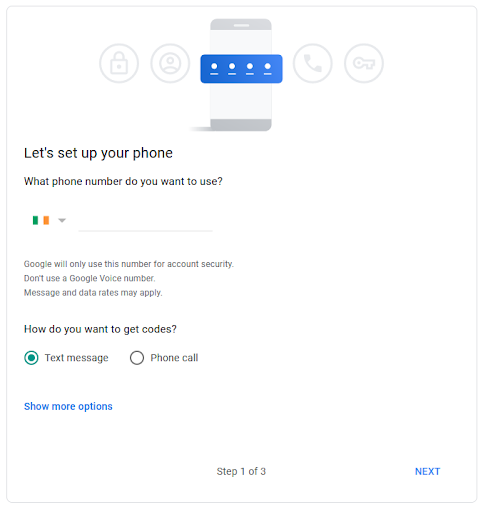
Once you receive the code enter the code and click “Next”

Finally you will get the following screen with a button “Turn On”.
On the next window you will get the option to turn it off instead click on the back button beside “2-Step Verification”

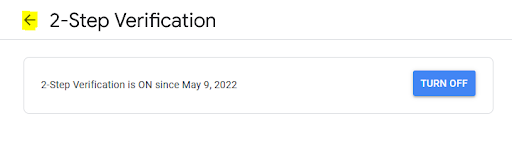
This will bring back to the “Security” page.
Scroll down to the “Signing to Google section” and there will be a new option “App passwords”

You will need to input your password again and then brought to the App passwords window.

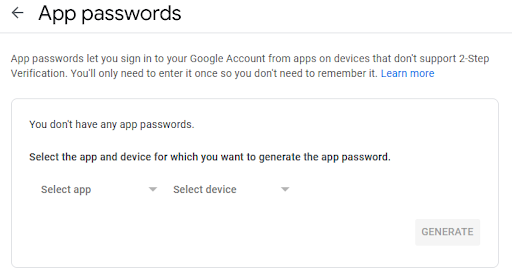
Click on the “Select app” and select “Other(Custom name)”
You can type any name but in this example we have typed “Big Red Cloud”

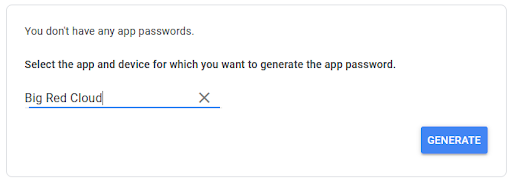
Click on the “GENERATE” button and it will generate an app password.

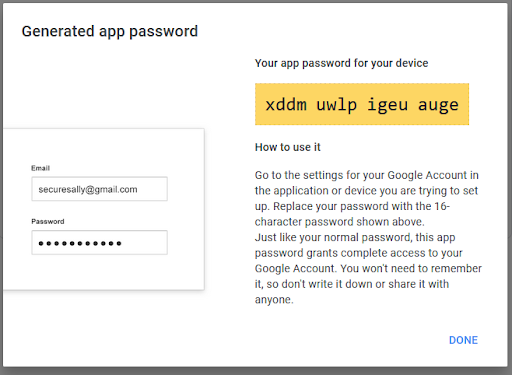
This will generate a random password highlighted in yellow.
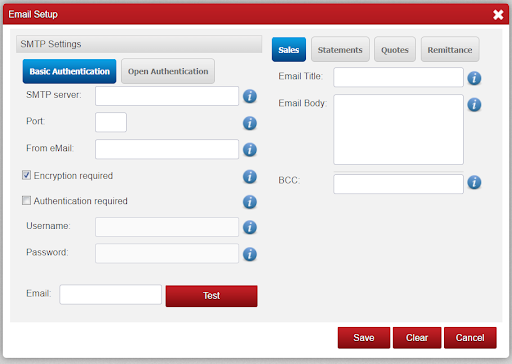
Take that password and input it to your email settings Big Red Cloud, Big Red Book or Big Red Book Payroll.

Big Red Cloud
Go to setup, Company details and email setup.

Big Red Book Payroll
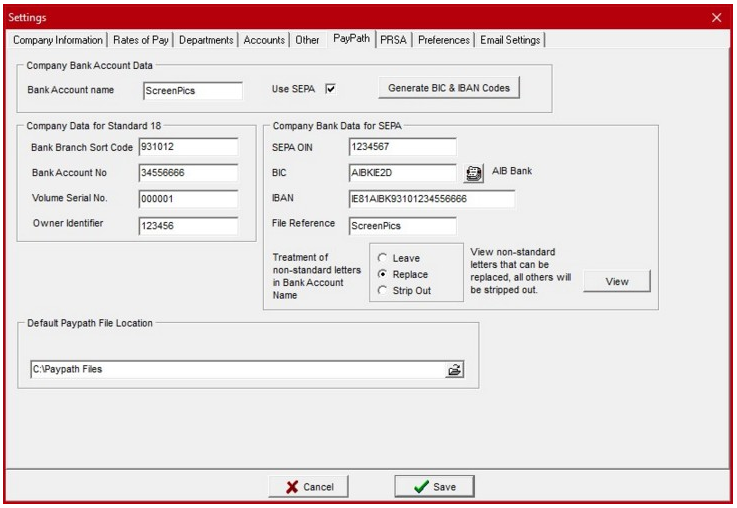
Go to Settings and Email Settings

If you would like help in setting your 2FA in Gmail call support on 01 204 8300

Other Payroll Support Topics

ERR Reporting

support-tick

Getting Started

emp-details

Employee Details Screen

support-cash

Payroll Processing

support-other

Employee Leaving

emp-cso

CSO EHECS Return

backup

Backups, Utilities & Support

misc

Miscellaneous