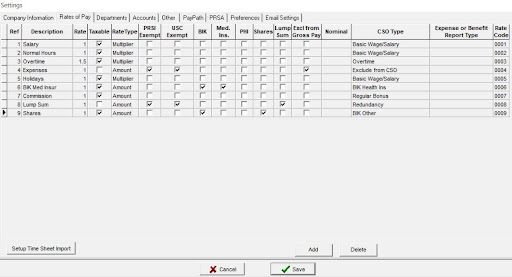
Breaking down the Rate of Pay:
Description:
This appears on the timesheets screen and on the payslip, e.g. Normal Hours, Overtime etc.
Taxable:
Tick if the Rate of Pay is Taxable, leave unticked if it is not taxable.
PRSI Exempt:
Tick if the Rate of Pay is PRSI exempt, leave unticked if it is not PRSI exempt.
USC Exempt:
Tick if the Rate of Pay is USC exempt, leave unticked if it is not USC exempt.
BIK:
Tick if the Rate of Pay is a BIK (Benefit in Kind), leave unticked if it is not a BIK.
Med Ins:
Tick if the BIK is for Medical Insurance, leave unticked if the BIK is not for Medical Insurance.
PHI:
This stands for Permanent Health Insurance. Our Help File has a section on this in more detail which is worth reading.
Shares:
Tick if the BIK is for Share-based remuneration in the company, leave unticked if it is not. Share-based remuneration might not be subject to Employer PRSI.
Lump Sum:
Tick if the Rate of Pay is a lump sum for an employee retiring or leaving work, leave unticked if it is not.
Excl from Gross Pay:
Tick this if the Rate of Pay is to be excluded from Gross Pay, if it is not to be then leave it unticked.
CSO Type:
A drop-down list is given of the CSO Types applicable. A CSO Type should be assigned to each Rate of Pay. This is required for accurate calculation of data for the CSO Earnings, Hours & Cost of Employment Survey.
Expense of Benefit Report Type:
If you are adding a Rate of Pay relating to ERR (Enhanced Reporting Requirements) select the Expense of Benefit Report Type that applies to that rate of pay. It will assign a Rate Code automatically.
Rate and Rate Type:
The Rate and Rate Type columns work together to determine how to calculate a particular Rate of Pay. We will break this down into its own section next.
Rate and Rate Type explanation:
With Rate Type there is a choice of Multiplier OR Amount.
Multiplier:
If the Rate Type is Multiplier, then that payment is the Rate x the employee’s Basic Rate box
Example 1: Basic Rate (from the Employee screen) of €20 x Rate 1 = €20. So, €20 x Units 40 (on timesheet) = €800
Example 2: Basic Rate (from the Employee screen) of €20 x Rate 1.5 (e.g. time and a half) = €30. So, €30 x Units 40 (on timesheet) = €1200
Amount:
If the Rate Type is Amount, then that particular Rate of Pay is treated as a literal amount e.g. expenses. The Basic Rate (from the Employee screen) is not part of the calculation.
Examples 3: Rate 1 x Amount entered on timesheet (e.g. 50) = €50
Example 4: Rate 1.5 x Amount entered on timesheet (e.g. 50) = €75
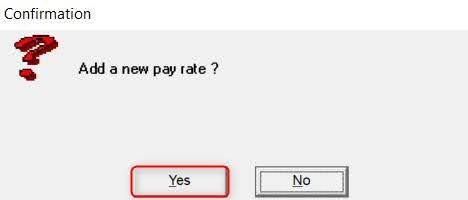
Adding and editing Rates of Pay:
Adding more Rates of Pay:
To add a new rate of pay, click on the last Rate of Pay, and press the down arrow key on the keyboard or click the Add button on screen, click Yes, and a new line will appear, and you can fill in the relevant details.